Ngân hàng đề — Google Cloud Associate Cloud Engineer
Tìm thấy 449 câu.
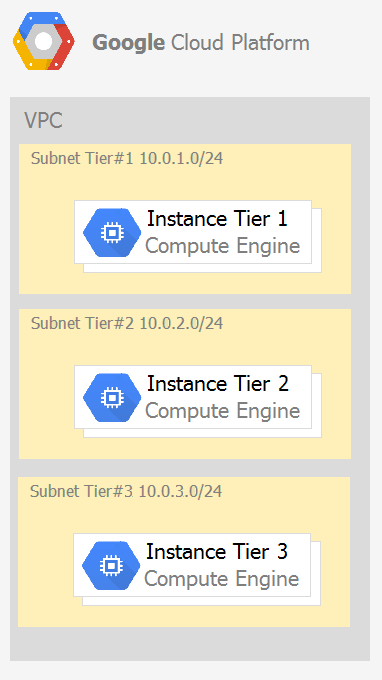
Each tier has a service account that is associated with all instances within it. You need to enable communication on TCP port 8080 between tiers as follows:
* Instances in tier #1 must communicate with tier #2.
* Instances in tier #2 must communicate with tier #3.
What should you do?
- A 1. Create an ingress firewall rule with the following settings: ג€¢ Targets: all instances ג€¢ Source filter: IP ranges (with the range set to 10.0.2.0/24) ג€¢ Protocols: allow all 2. Create an ingress firewall rule with the following settings: ג€¢ Targets: all instances ג€¢ Source filter: IP ranges (with the range set to 10.0.1.0/24) ג€¢ Protocols: allow all
- B 1. Create an ingress firewall rule with the following settings: ג€¢ Targets: all instances with tier #2 service account ג€¢ Source filter: all instances with tier #1 service account ג€¢ Protocols: allow TCP:8080 2. Create an ingress firewall rule with the following settings: ג€¢ Targets: all instances with tier #3 service account ג€¢ Source filter: all instances with tier #2 service account ג€¢ Protocols: allow TCP: 8080
- C 1. Create an ingress firewall rule with the following settings: ג€¢ Targets: all instances with tier #2 service account ג€¢ Source filter: all instances with tier #1 service account ג€¢ Protocols: allow all 2. Create an ingress firewall rule with the following settings: ג€¢ Targets: all instances with tier #3 service account ג€¢ Source filter: all instances with tier #2 service account ג€¢ Protocols: allow all
- D 1. Create an egress firewall rule with the following settings: ג€¢ Targets: all instances ג€¢ Source filter: IP ranges (with the range set to 10.0.2.0/24) ג€¢ Protocols: allow TCP: 8080 2. Create an egress firewall rule with the following settings: ג€¢ Targets: all instances ג€¢ Source filter: IP ranges (with the range set to 10.0.1.0/24) ג€¢ Protocols: allow TCP: 8080
Xem giải thích
🧩 Phân tích nội dung câu hỏi
Câu hỏi mô tả một kiến trúc 3-tier (ba lớp) chạy trên Google Compute Engine trong một VPC duy nhất. Dựa trên hình ảnh đính kèm:
- Subnet Tier #1: 10.0.1.0/24, chứa các instances Tier 1.
- Subnet Tier #2: 10.0.2.0/24, chứa các instances Tier 2.
- Subnet Tier #3: 10.0.3.0/24, chứa các instances Tier 3.
Mỗi tier có service account riêng gắn với tất cả instances trong tier đó. Yêu cầu là cho phép giao tiếp chỉ trên TCP port 8080:
- Instances Tier #1 gửi đến Tier #2.
- Instances Tier #2 gửi đến Tier #3.
Mục tiêu chính: Áp dụng firewall rules theo nguyên tắc least privilege (quyền hạn tối thiểu), tránh mở rộng không cần thiết (không allow all protocols hoặc tất cả instances). Trong GCP, firewall rules mặc định allow all egress (ra ngoài), nên ưu tiên ingress rules (vào) với source và target dựa trên service account để kiểm soát chính xác traffic giữa các tier. 📘
Nguồn tham khảo:
- Google Cloud VPC Firewall rules (cập nhật 2024-2026: Hỗ trợ service account impersonation cho firewall từ 2020).
- Compute Engine Networking best practices (phiên bản mới nhất 2025).
✅ Đáp án đúng
Lựa chọn thứ 2:
- Create an ingress firewall rule with the following settings: • Targets: all instances with tier #2 service account • Source filter: all instances with tier #1 service account • Protocols: allow TCP:8080 2. Create an ingress firewall rule with the following settings: • Targets: all instances with tier #3 service account • Source filter: all instances with tier #2 service account • Protocols: allow TCP: 8080
Lý do chọn:
- 🛠️ Ingress rule đúng hướng: Rule 1 cho phép traffic vào Tier #2 từ Tier #1 (target: SA Tier #2, source: SA Tier #1).
- 🛠️ Rule 2 cho phép traffic vào Tier #3 từ Tier #2 (target: SA Tier #3, source: SA Tier #2).
- 🔒 Least privilege: Chỉ allow TCP:8080, không mở all protocols. Sử dụng service account làm filter (hỗ trợ từ GCP 2020+, ổn định đến 2026) thay vì IP range (dễ scale và an toàn hơn vì instances có thể di chuyển).
- ✅ Hoàn hảo khớp yêu cầu, không ảnh hưởng traffic khác.
📋 Giải thích tất cả các phương án
-
❌ Phương án 1 (SAI):
- Create an ingress firewall rule with the following settings: • Targets: all instances • Source filter: IP ranges (with the range set to 10.0.2.0/24) • Protocols: allow all 2. Create an ingress firewall rule with the following settings: • Targets: all instances • Source filter: IP ranges (with the range set to 10.0.1.0/24) • Protocols: allow all
Phân tích sai:
- 🧩 IP range đảo ngược: Rule 1 dùng source 10.0.2.0/24 (Tier #2) vào all instances → Không cho Tier #1 (10.0.1.0/24) vào Tier #2.
- 🧩 Rule 2 dùng source 10.0.1.0/24 (Tier #1) vào all → Không khớp Tier #2 → Tier #3.
- 🚫 Targets: all instances → Mở rộng không cần, vi phạm least privilege.
- 🚫 Allow all protocols → Rủi ro bảo mật cao (mở UDP, ICMP...).
-
✅ Phương án 2 (ĐÚNG): (Đã giải thích chi tiết ở trên) – Hoàn hảo! 🎯
-
❌ Phương án 3 (SAI):
- Create an ingress firewall rule with the following settings: • Targets: all instances with tier #2 service account • Source filter: all instances with tier #1 service account • Protocols: allow all 2. Create an ingress firewall rule with the following settings: • Targets: all instances with tier #3 service account • Source filter: all instances with tier #2 service account • Protocols: allow all
Phân tích sai:
- 🛠️ Source/target SA đúng, hướng ingress đúng.
- 🚫 Allow all protocols → Không chỉ định TCP:8080, mở tất cả ports (bao gồm không an toàn), vi phạm yêu cầu "chỉ 8080" và best practice GCP.
-
❌ Phương án 4 (SAI):
- Create an egress firewall rule with the following settings: • Targets: all instances • Source filter: IP ranges (with the range set to 10.0.2.0/24) • Protocols: allow TCP: 8080 2. Create an egress firewall rule with the following settings: • Targets: all instances • Source filter: IP ranges (with the range set to 10.0.1.0/24) • Protocols: allow TCP: 8080
Phân tích sai:
- 🧩 Egress không phù hợp: GCP mặc định allow all egress, nên egress rule chỉ dùng để deny (không allow thêm). Traffic Tier #1 → Tier #2 kiểm soát bằng ingress của Tier #2, không phải egress.
- 🚫 Source filter sai ngữ cảnh: Egress không dùng source filter kiểu này (source là từ bên ngoài vào target).
- 🚫 IP range và targets all → Không chính xác, mở rộng, và đảo ngược range (10.0.2.0/24 cho rule 1?).
Kết luận: Chọn phương án 2 để đảm bảo an toàn, scale tốt trên GCP! 🚀
- A 1. Create a subnetwork in the same VPC, in europe-west1. 2. Create the new instance in the new subnetwork and use the first instance's private address as the endpoint.
- B 1. Create a VPC and a subnetwork in europe-west1. 2. Expose the application with an internal load balancer. 3. Create the new instance in the new subnetwork and use the load balancer's address as the endpoint.
- C 1. Create a subnetwork in the same VPC, in europe-west1. 2. Use Cloud VPN to connect the two subnetworks. 3. Create the new instance in the new subnetwork and use the first instance's private address as the endpoint.
- D 1. Create a VPC and a subnetwork in europe-west1. 2. Peer the 2 VPCs. 3. Create the new instance in the new subnetwork and use the first instance's private address as the endpoint.
Xem giải thích
🧩 Phân tích chi tiết nội dung câu hỏi
Câu hỏi thuộc chủ đề Google Cloud VPC và Compute Engine, tập trung vào việc triển khai tài nguyên đa vùng (multi-region) theo best practices của Google.
- Tình huống hiện tại: Dự án có 1 VPC duy nhất với 1 subnetwork ở vùng us-central1, chứa Compute Engine instance đang host một ứng dụng.
- Yêu cầu: Triển khai instance mới ở vùng europe-west1 (cùng dự án), instance mới này phải truy cập được ứng dụng trên instance cũ.
- Ràng buộc chính: Theo Google-recommended practices 📘 (tức là cách đơn giản, hiệu quả, an toàn nhất, tận dụng tính chất global scope của VPC trong GCP – VPC là tài nguyên toàn cầu, không bị giới hạn theo vùng).
- Mục tiêu: Đảm bảo kết nối private (không public IP) giữa hai instance ở hai vùng khác nhau, tránh phức tạp hóa với VPN, peering hay load balancer không cần thiết.
- Kiến thức cốt lõi (cập nhật đến 2026): Trong GCP VPC (phiên bản mới nhất), các subnetwork trong cùng một VPC có thể giao tiếp lẫn nhau qua private IP mặc định qua global VPC network routing 🛤️, không cần cấu hình thêm firewall (chỉ cần VPC firewall rules cho phép). Không khuyến khích tạo VPC mới cho multi-region vì tăng chi phí và độ phức tạp.
Nguồn tham khảo 📚:
- VPC networks overview (Google Cloud Docs, cập nhật 2024-2026).
- Multi-region VPC design best practices.
✅ Đáp án đúng và lý do lựa chọn
Đáp án đúng: Phương án 1.
Lý do: Đây là cách đơn giản, hiệu quả và theo Google-recommended practices nhất 🏆. VPC trong GCP là global, nên chỉ cần tạo subnetwork mới ở europe-west1 trong cùng VPC, deploy instance mới vào subnetwork đó. Hai instance sẽ tự động giao tiếp qua private IP (intra-VPC routing) mà không cần VPN, peering hay LB. Điều này tận dụng VPC routing tự động, giảm chi phí, độ trễ thấp và dễ quản lý firewall rules chung.
📋 Giải thích tất cả các phương án (đúng/sai)
-
Phương án 1: 1. Create a subnetwork in the same VPC, in europe-west1. 2. Create the new instance in the new subnetwork and use the first instance's private address as the endpoint.
✅ Đúng 🟢. Như giải thích trên, tận dụng global VPC để kết nối private IP trực tiếp. Best practice cho multi-region trong cùng dự án, không cần tài nguyên bổ sung. Firewall rules áp dụng toàn VPC, chỉ cần cho phép traffic (default allow egress). -
Phương án 2: 1. Create a VPC and a subnetwork in europe-west1. 2. Expose the application with an internal load balancer. 3. Create the new instance in the new subnetwork and use the load balancer's address as the endpoint.
❌ Sai 🔴. Tạo VPC mới là không cần thiết và không recommended vì làm phức tạp kiến trúc (cần peering sau). Internal Load Balancer (ILB) hỗ trợ cross-region nhưng chỉ dùng khi scale app hoặc HA, không phải cho single instance đơn giản. Tăng chi phí và độ trễ 🛑. -
Phương án 3: 1. Create a subnetwork in the same VPC, in europe-west1. 2. Use Cloud VPN to connect the two subnetworks. 3. Create the new instance in the new subnetwork and use the first instance's private address as the endpoint.
❌ Sai 🔴. Cloud VPN chỉ dùng để kết nối on-premises hoặc VPC khác nhau, không cần cho cùng VPC (routing tự động rồi). Sử dụng VPN sẽ tạo overhead không đáng có, tăng chi phí và độ phức tạp mạng 🚫. -
Phương án 4: 1. Create a VPC and a subnetwork in europe-west1. 2. Peer the 2 VPCs. 3. Create the new instance in the new subnetwork and use the first instance's private address as the endpoint.
❌ Sai 🔴. Tạo VPC mới và VPC Peering chỉ cần khi multi-project hoặc lý do cụ thể (như isolation). Với single project, dùng cùng VPC là recommended để tránh hạn chế peering (không transitive, giới hạn IP overlap). Phức tạp hơn và không scale tốt 🧩❌.
Kết luận 🎯: Luôn ưu tiên single global VPC cho multi-region trong cùng project để đơn giản hóa! Nếu cần isolation mạnh, mới xem xét multi-VPC.
- A 1. Go to the Logs ingestion window in Observability Logging, and disable the log source for the GKE container resource.
- B 1. Go to the Logs ingestion window in Observability Logging, and disable the log source for the GKE Cluster Operations resource.
- C 1. Go to the GKE console, and delete existing clusters. 2. Recreate a new cluster. 3. Clear the option to enable legacy Observability Logging.
- D 1. Go to the GKE console, and delete existing clusters. 2. Recreate a new cluster. 3. Clear the option to enable legacy Observability Monitoring.
Xem giải thích
🧩 Phân tích chi tiết nội dung câu hỏi
Câu hỏi mô tả tình huống: Dự án của bạn phát sinh chi phí cao hơn dự kiến trong tháng trước, nguyên nhân do một container phát triển trên GKE (Google Kubernetes Engine) tạo ra lượng log khổng lồ, dẫn đến hóa đơn Logging tăng vọt. Mục tiêu: Vô hiệu hóa việc thu thập log nhanh chóng nhất với số bước tối thiểu.
📌 Bối cảnh kỹ thuật (dựa trên GCP mới nhất đến 2026): GKE tích hợp với Cloud Logging (trong Observability), nơi logs từ container được thu thập tự động qua log sources cụ thể. Để giảm chi phí, cần disable ingestion (ngừng thu thập) log từ nguồn GKE container mà không ảnh hưởng toàn bộ cluster. Không cần xóa/tạo lại tài nguyên vì quá phức tạp và downtime cao.
✅ Đáp án đúng và lý do lựa chọn
Đáp án đúng: Go to the Logs ingestion window in Observability Logging, and disable the log source for the GKE container resource.
Lý do:
🛠️ Đây là cách nhanh nhất (chỉ 2 bước): Truy cập Logs ingestion window trong Observability > Logging (trên Console GCP), tìm log source tương ứng với GKE container resource (như container.googleapis.com/gke_container), rồi disable ngay lập tức. Logs sẽ ngừng ingestion sau vài phút, giảm chi phí mà không downtime cluster.
📘 Tính cập nhật: Theo docs GCP 2024-2026, Log Router & Ingestion controls cho phép granular control per resource type, ưu tiên cho GKE workloads (không dùng legacy nữa).
📋 Giải thích tất cả các phương án (đúng/sai)
Dưới đây là phân tích từng lựa chọn giữ nguyên văn bản gốc bằng tiếng Anh, với lý do đúng/sai bằng tiếng Việt. Sử dụng kiến thức GCP Observability mới nhất (không phải AWS, vì GKE là dịch vụ Google Cloud).
-
✅ Đúng: Go to the Logs ingestion window in Observability Logging, and disable the log source for the GKE container resource.
🧩 Giải thích: Phương án này chính xác và tối ưu vì trực tiếp target GKE container logs (resource split theo container/pod), disable ingestion mà không ảnh hưởng operations khác. Giảm chi phí ngay, chỉ 1-2 cú click trên Console. Hoàn hảo cho "minimum steps". -
❌ Sai: Go to the Logs ingestion window in Observability Logging, and disable the log source for the GKE Cluster Operations resource.
🧩 Giải thích: Không đúng nguồn log. "GKE Cluster Operations" chỉ cover control-plane logs (như kubelet, etcd), không phải container runtime logs. Disable cái này không giải quyết vấn đề container logs, chi phí vẫn cao. Cần target chính xác "GKE container". -
❌ Sai: 1. Go to the GKE console, and delete existing clusters. 2. Recreate a new cluster. 3. Clear the option to enable legacy Observability Logging.
🧩 Giải thích: Quá phức tạp (3+ bước lớn), gây downtime toàn cluster, mất data/pods. "Legacy Observability Logging" đã deprecated từ 2023; GCP dùng native Cloud Logging v2 với ingestion controls. Không phải "quick & minimum steps", vi phạm yêu cầu. -
❌ Sai: 1. Go to the GKE console, and delete existing clusters. 2. Recreate a new cluster. 3. Clear the option to enable legacy Observability Monitoring.
🧩 Giải thích: Tương tự sai trên, nhưng nhầm lẫn Monitoring (metrics) với Logging (logs). Disable Monitoring không ảnh hưởng logs, chỉ metrics. Vẫn downtime cao, dùng legacy (không cập nhật), không giải quyết "huge number of logs".
📚 Tài liệu tham khảo (GCP chính thức, cập nhật 2024-2026)
- Cloud Logging Ingestion Controls – Hướng dẫn disable per log source.
- GKE Logging Integration – Chi tiết GKE container vs. cluster ops logs.
- Cost Optimization for Logging – Best practices giảm chi phí logs.
🔍 Lưu ý: Kiểm tra Console GCP > Observability > Logging > Ingestion để thực hành!
- A Deploy the new version in the same application and use the --migrate option.
- B Deploy the new version in the same application and use the --splits option to give a weight of 99 to the current version and a weight of 1 to the new version.
- C Create a new App Engine application in the same project. Deploy the new version in that application. Use the App Engine library to proxy 1% of the requests to the new version.
- D Create a new App Engine application in the same project. Deploy the new version in that application. Configure your network load balancer to send 1% of the traffic to that new application.
Xem giải thích
🧩 Phân tích nội dung câu hỏi
Câu hỏi tập trung vào Google App Engine Standard Environment (một dịch vụ PaaS của Google Cloud Platform - GCP), nơi bạn đang host một website. Yêu cầu chính là:
- Triển khai một phiên bản test mới (new test version) để 1% người dùng (users) thấy phiên bản này, trong khi 99% còn lại tiếp tục dùng phiên bản hiện tại.
- Mục tiêu ưu tiên: Giảm thiểu độ phức tạp (minimize complexity).
🛠️ Bối cảnh kỹ thuật: App Engine hỗ trợ multi-version deployment trong cùng một application (app), cho phép split traffic giữa các version theo tỷ lệ phần trăm (%) một cách tự động mà không cần cấu hình thêm load balancer hay proxy phức tạp. Điều này lý tưởng cho canary deployment hoặc A/B testing. Kiến thức dựa trên tài liệu GCP cập nhật mới nhất (2024-2026), nơi --splits vẫn là phương pháp chuẩn cho traffic splitting trên App Engine Standard.
📘 Tài liệu tham khảo:
✅ Đáp án đúng và lý do lựa chọn
Đáp án đúng: Deploy the new version in the same application and use the --splits option to give a weight of 99 to the current version and a weight of 1 to the new version.
Lý do chọn (chi tiết):
- Phương án này tối ưu hóa độ phức tạp thấp nhất 🏆: Deploy version mới vào cùng application hiện tại (không cần tạo app mới), sau đó dùng lệnh
gcloud app deploy --splits="v1=99,v2=1"để phân bổ traffic chính xác 99% cho version cũ (v1) và 1% cho version mới (v2). - App Engine tự động route traffic dựa trên IP hoặc cookie của user, đảm bảo ổn định và dễ rollback (chỉ cần chỉnh splits lại).
- Phù hợp App Engine Standard (không cần infrastructure thủ công như load balancer). Đây là best practice cho canary release theo docs GCP 2026.
📋 Phân tích chi tiết tất cả các phương án
Dưới đây là phân tích từng lựa chọn một cách đầy đủ, giữ nguyên nội dung gốc bằng tiếng Anh. Mỗi phương án được đánh giá ✅ (đúng) hoặc ❌ (sai), kèm giải thích rõ ràng dựa trên tính năng GCP.
-
Deploy the new version in the same application and use the --migrate option.
❌ Sai: Lệnh--migratechỉ dùng để chuyển 100% traffic từ version cũ sang version mới một cách dần dần (gradual migration), không hỗ trợ split theo tỷ lệ cụ thể như 99/1. Điều này sẽ làm toàn bộ users thấy version mới ngay lập tức, vi phạm yêu cầu chỉ 1%. Phức tạp không giảm vì không linh hoạt cho testing. -
Deploy the new version in the same application and use the --splits option to give a weight of 99 to the current version and a weight of 1 to the new version.
✅ Đúng: Như đã giải thích ở trên, đây là phương pháp chuẩn và đơn giản nhất trên App Engine.--splitscho phép định nghĩa tỷ lệ traffic chính xác (weight từ 0-100), deploy nhanh qua gcloud, và App Engine tự handle routing. Không cần thay đổi code hay infra, lý tưởng cho minimize complexity. -
Create a new App Engine application in the same project. Deploy the new version in that application. Use the App Engine library to proxy 1% of the requests to the new version.
❌ Sai: Tạo app mới (mỗi app có domain riêng) làm tăng độ phức tạp cao vì phải code proxy logic thủ công (sử dụng App Engine library nhưurlfetchhoặc custom handler) để route 1% requests. Điều này yêu cầu thay đổi code chính, khó maintain, và không tận dụng native traffic splitting của App Engine. Không phải best practice. -
Create a new App Engine application in the same project. Deploy the new version in that application. Configure your network load balancer to send 1% of the traffic to that new application.
❌ Sai: Tạo app mới đã phức tạp, cộng thêm cấu hình Network Load Balancer (một dịch vụ riêng của GCP) để split traffic – điều này không khả thi trực tiếp vì App Engine không expose IP tĩnh cho NLB (App Engine dùng serverless routing). Yêu cầu infra phức tạp (VPC, forwarding rules), vi phạm "minimize complexity" và không dành cho Standard Environment.
🔍 Kết luận: Phương án đúng tận dụng native feature của App Engine để đạt hiệu quả cao nhất. Nếu deploy thực tế, dùng lệnh: gcloud app deploy app.yaml --version=v2 --splits="v1=99,v2=1". Nếu cần hỗ trợ thêm lab hoặc troubleshooting, hãy hỏi nhé! 🚀
- A Perform a rolling-action start-update with maxSurge set to 0 and maxUnavailable set to 1.
- B Perform a rolling-action start-update with maxSurge set to 1 and maxUnavailable set to 0.
- C Create a new managed instance group with an updated instance template. Add the group to the backend service for the load balancer. When all instances in the new managed instance group are healthy, delete the old managed instance group.
- D Create a new instance template with the new application version. Update the existing managed instance group with the new instance template. Delete the instances in the managed instance group to allow the managed instance group to recreate the instance using the new instance template.
Xem giải thích
🧩 Phân tích chi tiết nội dung câu hỏi
Câu hỏi thuộc chủ đề Managed Instance Groups (MIG) trong Google Cloud Compute Engine (không phải AWS như đề cập nhầm, vì MIG là tính năng độc quyền của GCP).
- Tình huống: Bạn có một ứng dụng web đang chạy trên MIG, nhận traffic thực tế (live web traffic). Bạn cần triển khai phiên bản mới dần dần (gradually deploy) mà không làm giảm dung lượng khả dụng (available capacity) trong quá trình cập nhật.
- Yêu cầu chính: Sử dụng cơ chế rolling update an toàn, đảm bảo số lượng instance luôn đủ hoặc hơn để xử lý traffic, tránh downtime hoặc giảm capacity.
- Kiến thức cốt lõi (cập nhật đến 2026): MIG hỗ trợ rolling-action start-update với hai tham số quan trọng:
- maxSurge: Số instance thêm mới tạm thời (tăng capacity).
- maxUnavailable: Số instance có thể unavailable (giảm capacity). Để không giảm capacity, phải set maxUnavailable = 0 (không cho phép instance nào down) và maxSurge > 0 (tạo instance mới trước khi thay thế cũ). Điều này đảm bảo capacity duy trì hoặc tăng nhẹ trong quá trình deploy.
✅ Đáp án đúng và lý do lựa chọn
Đáp án đúng: Perform a rolling-action start-update with maxSurge set to 1 and maxUnavailable set to 0.
Lý do 🛠️:
- Cấu hình này kích hoạt rolling update dần dần: MIG sẽ tạo 1 instance mới (maxSurge=1) với template mới trước khi thay thế instance cũ.
- maxUnavailable=0 đảm bảo KHÔNG instance nào bị down cùng lúc, nên capacity không bao giờ giảm (thậm chí tăng tạm thời lên 1 instance).
- Hoàn hảo cho live traffic, gradual deploy, và zero downtime. Đây là best practice theo docs GCP mới nhất.
📋 Giải thích tất cả các phương án (đúng/sai)
-
❌ [SAI] Perform a rolling-action start-update with maxSurge set to 0 and maxUnavailable set to 1.
Phân tích: maxSurge=0 nghĩa là không tạo instance mới, MIG chỉ thay thế bằng cách tắt 1 instance cũ (maxUnavailable=1) rồi tạo mới. Kết quả: capacity giảm tạm thời 1 instance → Vi phạm yêu cầu "available capacity does not decrease". Không an toàn cho live traffic. -
✅ [ĐÚNG] Perform a rolling-action start-update with maxSurge set to 1 and maxUnavailable set to 0.
Phân tích: Như đã giải thích ở trên. MIG tạo 1 instance mới trước, kiểm tra healthy rồi mới thay thế instance cũ mà không down cái nào. Capacity duy trì ổn định, deploy gradual, zero-downtime. Lý tưởng nhất! 🎯 -
❌ [SAI] Create a new managed instance group with an updated instance template. Add the group to the backend service for the load balancer. When all instances in the new managed instance group are healthy, delete the old managed instance group.
Phân tích: Đây là blue-green deployment: Tạo MIG mới song song, thêm vào backend service (load balancer phân traffic dần). Tuy an toàn nhưng KHÔNG gradual trong MIG cũ (toàn bộ traffic có thể chuyển đột ngột), và capacity tăng gấp đôi tạm thời (2 MIG cùng chạy) → Tốn chi phí, phức tạp hơn rolling update. Không phải cách tối ưu cho MIG. -
❌ [SAI] Create a new instance template with the new application version. Update the existing managed instance group with the new instance template. Delete the instances in the managed instance group to allow the managed instance group to recreate the instance using the new instance template.
Phân tích: Update template rồi xóa thủ công instances → MIG recreate với version mới. Nhưng việc xóa gây downtime lớn (nhiều instances unavailable cùng lúc), capacity giảm mạnh cho đến khi recreate xong. Không gradual, không an toàn cho live traffic → Rủi ro cao!
📘 Tài liệu tham khảo (GCP docs cập nhật 2026)
- Rolling out updates to managed instance groups – Chi tiết maxSurge/maxUnavailable.
- About managed instance groups – Best practices cho deployment.
- Associate Cloud Engineer Exam Guide: Phần "Planning and configuring compute resources" (Google Cloud Skills Boost).
Hy vọng phân tích giúp bạn ôn thi hiệu quả! 🚀 Nếu cần thêm ví dụ gcloud CLI, hỏi nhé!
- A Cloud SQL
- B Cloud Spanner
- C Cloud Firestore
- D Cloud Datastore
Xem giải thích
🧩 Phân tích nội dung câu hỏi
Câu hỏi mô tả tình huống bạn đang xây dựng một ứng dụng lưu trữ dữ liệu quan hệ (relational data) từ người dùng, với người dùng phân bố toàn cầu (across the globe). CTO lo ngại về yêu cầu mở rộng quy mô vì kích thước người dùng chưa xác định. Yêu cầu là triển khai giải pháp cơ sở dữ liệu có thể mở rộng theo sự tăng trưởng người dùng với thay đổi cấu hình tối thiểu (minimum configuration changes).
🛠️ Yêu cầu chính:
- Dữ liệu quan hệ (hỗ trợ SQL, schema, ACID transactions).
- Mở rộng toàn cầu tự động (global scale).
- Ít thay đổi cấu hình khi scale (tự động horizontal scaling).
📘 Đây là câu hỏi điển hình trong Google Cloud Associate Cloud Engineer, tập trung vào dịch vụ cơ sở dữ liệu phù hợp cho workload toàn cầu với relational data.
✅ Đáp án đúng và lý do lựa chọn
Cloud Spanner là đáp án đúng!
🧩 Lý do: Cloud Spanner là cơ sở dữ liệu quan hệ phân tán toàn cầu (globally distributed relational database) của Google Cloud, hỗ trợ horizontal scaling tự động (tự động shard và replicate dữ liệu qua nhiều region). Nó xử lý hàng nghìn node mà không cần thay đổi cấu hình lớn, duy trì strong consistency và ACID transactions toàn cầu. Hoàn hảo cho user base tăng trưởng không xác định, với zero-downtime scaling.
📘 Nguồn tham khảo: Google Cloud Spanner Docs (cập nhật 2024-2026) – Spanner hỗ trợ autoscaling nodes và multi-region configs mà không cần refactor schema.
📋 Giải thích chi tiết tất cả các phương án
Dưới đây là phân tích từng lựa chọn, giữ nguyên văn bản gốc bằng tiếng Anh. Tôi đánh dấu ✅ đúng hoặc ❌ sai, kèm giải thích bằng tiếng Việt rõ ràng:
-
Cloud SQL ❌
❌ Sai vì: Cloud SQL là dịch vụ managed relational DB (MySQL/PostgreSQL/SQL Server), hỗ trợ vertical scaling và read replicas, nhưng không tự động scale horizontally toàn cầu. Để scale multi-region, cần thay đổi cấu hình thủ công (setup cross-region replication, failover), không phù hợp với "minimum configuration changes" cho user growth lớn và không xác định. Nó tốt cho workload regional, không phải global scale seamless. -
Cloud Spanner ✅
✅ Đúng vì: Như đã giải thích ở trên, Spanner là lựa chọn lý tưởng cho relational data toàn cầu, autoscaling nodes tự động (tăng/giảm theo workload mà không downtime), hỗ trợ 99.999% availability multi-region. Không cần refactor app code hay config lớn khi scale từ hàng trăm đến hàng triệu users.
🛠️ Ưu điểm nổi bật: TrueTime cho consistency, autosharding dữ liệu. -
Cloud Firestore ❌
❌ Sai vì: Cloud Firestore là NoSQL document database (serverless), scale tự động toàn cầu rất tốt, nhưng không hỗ trợ relational data (không có schema cố định, joins phức tạp, foreign keys). Không phù hợp với yêu cầu "relational data from users" cần SQL queries chuẩn. -
Cloud Datastore ❌
❌ Sai vì: Cloud Datastore (nay tích hợp vào Firestore) là NoSQL key-value/document store, scale horizontally tự động, nhưng không phải relational DB (thiếu ACID full, schema-less). Không đáp ứng nhu cầu relational data với scaling minimum config cho global users. Đã deprecated một phần từ 2021, ưu tiên Firestore.
🛠️ Tóm tắt so sánh nhanh:
| Đặc điểm | Cloud SQL | Cloud Spanner | Firestore/Datastore |
|----------|-----------|---------------|---------------------|
| Relational | ✅ | ✅ | ❌ |
| Global auto-scale min config | ❌ | ✅ | ✅ (nhưng NoSQL) |
📘 Tài liệu bổ sung:
- GCP Database Comparison (2024)
- Spanner Scaling Guide – Xác nhận autoscaling đến 2026 với Regional/Multi-region configs.
Hy vọng phân tích này giúp bạn ôn thi hiệu quả! 🚀
- A Assign the finance team only the Billing Account User role on the billing account.
- B Assign the engineering team only the Billing Account User role on the billing account.
- C Assign the finance team the Billing Account User role on the billing account and the Project Billing Manager role on the organization.
- D Assign the engineering team the Billing Account User role on the billing account and the Project Billing Manager role on the organization.
Xem giải thích
🧩 Phân tích chi tiết nội dung câu hỏi
Câu hỏi này thuộc lĩnh vực quản lý tổ chức (Organization), dự án (Project) và hóa đơn (Billing) trong Google Cloud Platform (GCP) (không phải AWS như mô tả ban đầu, có thể là nhầm lẫn). Bạn đang đóng vai quản trị viên tổ chức và hóa đơn (organization and billing administrator) cho công ty.
- Tình huống hiện tại: Nhóm kỹ thuật (engineering team) đã được cấp quyền Project Creator trên tổ chức (organization). Quyền này cho phép họ tạo dự án mới, nhưng không mặc định cho phép liên kết dự án với tài khoản hóa đơn (billing account).
- Yêu cầu chính: ✅ Ngăn nhóm kỹ thuật liên kết dự án với billing account. ✅ Chỉ nhóm tài chính (finance team) được liên kết dự án với billing account. ✅ Nhóm tài chính KHÔNG được thực hiện bất kỳ thay đổi nào khác trên dự án (ví dụ: chỉnh sửa IAM, resources, v.v.).
- Mục tiêu: Thiết lập quyền IAM (Identity and Access Management) chính xác để kiểm soát việc liên kết hóa đơn, sử dụng các vai trò (roles) như Billing Account User (trên billing account) và Project Billing Manager (trên organization).
Dựa trên tài liệu GCP mới nhất (cập nhật đến 2024-2026, IAM roles không thay đổi lớn), quyền Project Billing Manager (roles/billing.projectManager) tại mức organization/folder cho phép liên kết/tháo liên kết dự án với billing account, nhưng không cấp quyền chỉnh sửa nội dung dự án khác. Kết hợp với Billing Account User (roles/billing.user) trên billing account để quản lý liên kết cụ thể.
📘 Tài liệu tham khảo:
- GCP Billing roles and permissions (IAM for Cloud Billing).
- GCP Organization roles (Project Billing Manager details).
- GCP Associate Cloud Engineer exam guide (Phần 2.4: Configuring access).
✅ Đáp án đúng và lý do lựa chọn
Đáp án đúng: Assign the finance team the Billing Account User role on the billing account and the Project Billing Manager role on the organization.
Lý do 🛠️:
- Billing Account User (roles/billing.user) trên billing account: Cho phép nhóm tài chính xem và quản lý các dự án liên kết với billing account cụ thể.
- Project Billing Manager (roles/billing.projectManager) trên organization: Cho phép liên kết/tháo liên kết dự án với billing account trong tổ chức, mà không cấp quyền chỉnh sửa khác (như deploy resources, manage IAM trên project).
- Kết hợp hai quyền này chính xác đáp ứng yêu cầu: Finance chỉ làm được việc link billing, không ảnh hưởng project nội dung. Engineering chỉ có Project Creator nên không thể link billing (Project Creator không bao gồm billing perms).
- Đây là best practice theo GCP để phân tách quyền billing tinh gọn.
❌ Giải thích tất cả các phương án (đúng/sai)
-
[SAI] Assign the finance team only the Billing Account User role on the billing account.
❌ Sai vì: Quyền Billing Account User chỉ cho phép xem và quản lý liên kết billing, nhưng KHÔNG đủ để thực hiện liên kết dự án nếu không có Project Billing Manager trên organization/project. Finance sẽ không thể link project, vi phạm yêu cầu. -
[SAI] Assign the engineering team only the Billing Account User role on the billing account.
❌ Sai vì: Cấp quyền này cho engineering sẽ cho phép họ liên kết dự án (kết hợp với Project Creator họ đã có), dẫn đến mất kiểm soát – trái với yêu cầu ngăn engineering link billing. Finance không được đề cập. -
[ĐÚNG] Assign the finance team the Billing Account User role on the billing account and the Project Billing Manager role on the organization.
✅ Đúng vì: Như giải thích ở trên, kết hợp hoàn hảo để finance chỉ link billing mà không thay đổi project khác. Engineering không bị ảnh hưởng. -
[SAI] Assign the engineering team the Billing Account User role on the billing account and the Project Billing Manager role on the organization.
❌ Sai vì: Cấp hai quyền này cho engineering sẽ cho phép họ tự do link/unlink billing, vi phạm yêu cầu ngăn chặn. Finance không được cấp quyền gì.
🧩 Lưu ý cuối: Trong GCP thực tế (phiên bản 2026), luôn kiểm tra quyền bằng Policy Analyzer hoặc IAM Recommender để tránh over-permission. Nếu áp dụng, test ở môi trường dev trước! 🚀
- A 1. In GKE, create a Service of type LoadBalancer that uses the application's Pods as backend. 2. Set the service's externalTrafficPolicy to Cluster. 3. Configure the Compute Engine instance to use the address of the load balancer that has been created.
- B 1. In GKE, create a Service of type NodePort that uses the application's Pods as backend. 2. Create a Compute Engine instance called proxy with 2 network interfaces, one in each VPC. 3. Use iptables on this instance to forward traffic from gce-network to the GKE nodes. 4. Configure the Compute Engine instance to use the address of proxy in gce-network as endpoint.
- C 1. In GKE, create a Service of type LoadBalancer that uses the application's Pods as backend. 2. Add an annotation to this service: cloud.google.com/load-balancer-type: Internal 3. Peer the two VPCs together. 4. Configure the Compute Engine instance to use the address of the load balancer that has been created.
- D 1. In GKE, create a Service of type LoadBalancer that uses the application's Pods as backend. 2. Add a Cloud Armor Security Policy to the load balancer that whitelists the internal IPs of the MIG's instances. 3. Configure the Compute Engine instance to use the address of the load balancer that has been created.
Xem giải thích
🧩 Phân tích chi tiết nội dung câu hỏi
Câu hỏi mô tả một tình huống thực tế trong Google Cloud Platform (GCP):
- Bạn có ứng dụng chạy trên Google Kubernetes Engine (GKE) với cluster autoscaling được bật (tức cluster tự động scale node dựa trên nhu cầu).
- Ứng dụng expose một TCP endpoint (cổng TCP), và có nhiều replicas (pods) để đảm bảo tính sẵn sàng cao.
- Có một Compute Engine instance nằm cùng region nhưng trong VPC khác (gce-network), không overlap IP ranges với VPC của GKE.
- Mục tiêu: Instance này cần kết nối đến ứng dụng trên GKE một cách tối thiểu effort (ít công sức nhất, tránh cấu hình phức tạp).
🛠️ Thách thức chính: Cross-VPC communication trong cùng region mà không overlap IP, cần giải pháp đơn giản, an toàn, tận dụng tính năng native của GCP như Service trong GKE và networking.
📘 Dẫn nguồn:
- GKE Services: cloud.google.com/kubernetes-engine/docs/concepts/service (cập nhật 2024-2026: Hỗ trợ Internal LoadBalancer qua annotation).
- VPC Peering: cloud.google.com/vpc/docs/vpc-peering (phiên bản mới nhất hỗ trợ same-region peering dễ dàng, không cần Transit Gateway như AWS).
✅ Đáp án đúng và lý do lựa chọn
Đáp án đúng là phương án thứ 3:
- In GKE, create a Service of type LoadBalancer that uses the application's Pods as backend. 2. Add an annotation to this service: cloud.google.com/load-balancer-type: Internal 3. Peer the two VPCs together. 4. Configure the Compute Engine instance to use the address of the load balancer that has been created.
Lý do chọn:
- Phương án này tối thiểu effort nhất: Tạo Internal LoadBalancer (ILB) qua annotation
cloud.google.com/load-balancer-type: Internaltrên Service type LoadBalancer → LB chỉ expose IP nội bộ (RFC 1918), accessible từ cùng region. - VPC Peering (same-region) cho phép traffic private routing giữa 2 VPC không overlap IP, không cần NAT/proxy/public IP.
- Hỗ trợ cluster autoscaling vì ILB tự động discover backend pods/nodes. TCP endpoint được proxy đúng cách.
- ✅ Ưu điểm: Native GCP, scale tự động, bảo mật cao (private only), setup nhanh (peering chỉ cần vài lệnh gcloud).
🧩 Phân tích tất cả các phương án (đúng/sai)
-
Phương án 1:
- In GKE, create a Service of type LoadBalancer that uses the application's Pods as backend. 2. Set the service's externalTrafficPolicy to Cluster. 3. Configure the Compute Engine instance to use the address of the load balancer that has been created.
❌ Sai vì: LoadBalancer mặc định tạo External LB (public IP), không giải quyết cross-VPC private (instance ở VPC khác không route trực tiếp đến public LB mà không qua internet/NAT, vi phạm minimize effort).externalTrafficPolicy: Clusterchỉ optimize proxy mode, không liên quan cross-VPC. Effort cao hơn do cần firewall/public exposure.
- In GKE, create a Service of type LoadBalancer that uses the application's Pods as backend. 2. Set the service's externalTrafficPolicy to Cluster. 3. Configure the Compute Engine instance to use the address of the load balancer that has been created.
-
Phương án 2:
- In GKE, create a Service of type NodePort that uses the application's Pods as backend. 2. Create a Compute Engine instance called proxy with 2 network interfaces, one in each VPC. 3. Use iptables on this instance to forward traffic from gce-network to the GKE nodes. 4. Configure the Compute Engine instance to use the address of proxy in gce-network as endpoint.
❌ Sai vì: Giải pháp phức tạp cao (multi-NIC alias IP, iptables rules, quản lý proxy VM), không minimize effort. NodePort expose port trên node (không scale tốt với autoscaling), dễ single point of failure. Không native, tốn chi phí vận hành lâu dài.
- In GKE, create a Service of type NodePort that uses the application's Pods as backend. 2. Create a Compute Engine instance called proxy with 2 network interfaces, one in each VPC. 3. Use iptables on this instance to forward traffic from gce-network to the GKE nodes. 4. Configure the Compute Engine instance to use the address of proxy in gce-network as endpoint.
-
Phương án 3 (Đúng - đã giải thích ở trên):
✅ Đúng vì: Kết hợp Internal LB (private IP, scale với GKE) + VPC Peering (routing private cross-VPC same-region). Hoàn hảo cho TCP, autoscaling, effort thấp (chỉ annotation + peering). -
Phương án 4:
- In GKE, create a Service of type LoadBalancer that uses the application's Pods as backend. 2. Add a Cloud Armor Security Policy to the load balancer that whitelists the internal IPs of the MIG's instances. 3. Configure the Compute Engine instance to use the address of the load balancer that has been created.
❌ Sai vì: LoadBalancer vẫn là External LB (public), Cloud Armor chỉ filter L7 (không whitelist internal IPs hiệu quả cho cross-VPC). MIG (Managed Instance Group) là cho nodes, không phải client IPs. Không giải quyết routing private, effort cao (policy config), rủi ro public exposure.
- In GKE, create a Service of type LoadBalancer that uses the application's Pods as backend. 2. Add a Cloud Armor Security Policy to the load balancer that whitelists the internal IPs of the MIG's instances. 3. Configure the Compute Engine instance to use the address of the load balancer that has been created.
🛠️ Tóm tắt khuyến nghị: Sử dụng Internal LB + VPC Peering là best practice GCP 2026 cho private cross-VPC GKE access. Test bằng kubectl apply và gcloud compute networks peerings create.
- A Create an export to the sink that saves logs from Cloud Audit to BigQuery.
- B Create an export to the sink that saves logs from Cloud Audit to a Coldline Storage bucket.
- C Write a custom script that uses logging API to copy the logs from Observability logs to BigQuery.
- D Export these logs to Cloud Pub/Sub and write a Cloud Dataflow pipeline to store logs to Cloud SQL.
Xem giải thích
🧩 Phân tích nội dung câu hỏi
Câu hỏi mô tả một tổ chức tài chính cần lưu trữ file log kiểm toán (audit log files) trong 3 năm, với hàng trăm Google Cloud projects. Yêu cầu là triển khai cách tiếp cận tiết kiệm chi phí (cost-effective) cho việc giữ log.
- Audit logs ở đây đề cập đến Cloud Audit Logs trong Google Cloud Logging (Observability), ghi lại các hoạt động quan trọng như truy cập IAM, thay đổi config – rất cần thiết cho tuân thủ (compliance) trong lĩnh vực tài chính.
- Thách thức: Scale lớn (hundreds projects), thời gian lưu dài (3 năm), ưu tiên cost-effective → cần giải pháp lưu trữ rẻ, ít truy cập thường xuyên (infrequent access), dễ quản lý trung tâm hóa.
- Giải pháp lý tưởng: Sử dụng Log Sinks để export logs từ Cloud Logging ra storage lâu dài, hỗ trợ aggregation từ nhiều projects vào một sink duy nhất (organization-level sink).
📘 Tài liệu tham khảo:
- Cloud Logging Export (cập nhật 2024-2026: Hỗ trợ export Audit Logs trực tiếp).
- Cloud Storage Classes (Coldline phù hợp cho retention 90-365 ngày+, chi phí ~$0.004/GiB/tháng).
✅ Đáp án đúng và lý do lựa chọn
Đáp án đúng: Create an export to the sink that saves logs from Cloud Audit to a Coldline Storage bucket.
🛠️ Lý do chi tiết:
- Cost-effective nhất cho retention dài hạn: Coldline Storage (Nearline/Coldline class) có chi phí lưu trữ thấp (~$0.004-0.01/GiB/tháng), lý tưởng cho dữ liệu ít truy cập như audit logs lưu 3 năm.
- Scale dễ dàng: Tạo organization-level Log Sink để tập trung export Audit Logs từ hàng trăm projects vào một bucket duy nhất, không cần script custom.
- Tuân thủ: Logs được lưu immutable (không xóa ngẫu nhiên), hỗ trợ lifecycle policies tự động xóa sau 3 năm.
- Theo best practices Google Cloud (2026): Khuyến nghị export Audit Logs ra Coldline/Archive cho compliance dài hạn thay vì giữ trong Logging (đắt hơn).
📋 Giải thích tất cả các phương án
-
❌ Phương án SAI: Create an export to the sink that saves logs from Cloud Audit to BigQuery.
🧨 Lý do sai: BigQuery phù hợp cho phân tích/query lớn, nhưng chi phí lưu trữ cao (~$0.02/GiB/tháng + query fees), không cost-effective cho retention thụ động 3 năm với volume lớn từ hundreds projects. BigQuery không phải storage chính cho logs lâu dài. -
✅ Phương án ĐÚNG: Create an export to the sink that saves logs from Cloud Audit to a Coldline Storage bucket.
🛠️ Lý do đúng: Như đã giải thích ở trên – rẻ, scale, dễ quản lý. Coldline tối ưu cho dữ liệu cold (lưu >90 ngày), hỗ trợ sink trực tiếp từ Audit Logs. -
❌ Phương án SAI: Write a custom script that uses logging API to copy the logs from Observability logs to BigQuery.
🧨 Lý do sai: Không scale và tốn kém vận hành cho hundreds projects (cần script chạy liên tục, handle errors, auth multi-project). Custom script kém reliable so với native Log Sinks, BigQuery vẫn đắt cho retention. -
❌ Phương án SAI: Export these logs to Cloud Pub/Sub and write a Cloud Dataflow pipeline to store logs to Cloud SQL.
🧨 Lý do sai: Phức tạp và đắt đỏ: Pub/Sub + Dataflow tốn phí streaming ($0.04/GB + compute), Cloud SQL là relational DB đắt ($0.17/GB/tháng) và không phù hợp lưu logs lớn (cần schema, indexing). Không cost-effective cho simple retention.
🏆 Kết luận: Phương án đúng tận dụng native tools Google Cloud Logging + Storage, đảm bảo tuân thủ, scale, tiết kiệm – phù hợp Associate Cloud Engineer exam! 🚀
- A Create a Cloud Memorystore for Redis instance with 32-GB capacity.
- B Run it on Compute Engine, and choose a custom instance type with 6 vCPUs and 32 GB of memory.
- C Package it in a container image, and run it on Kubernetes Engine, using n1-standard-32 instances as nodes.
- D Run it on Compute Engine, choose the instance type n1-standard-1, and add an SSD persistent disk of 32 GB.
Xem giải thích
🧩 Phân tích nội dung câu hỏi
Câu hỏi yêu cầu triển khai một reverse proxy HTTP caching đơn lẻ trên GCP dành cho website nhạy cảm với độ trễ (latency-sensitive). Reverse proxy này gần như không tiêu thụ CPU, cần 30 GB bộ nhớ đệm trong RAM (in-memory cache) và thêm 2 GB RAM cho các tiến trình khác (tổng 32 GB RAM). Mục tiêu chính là tối ưu hóa chi phí (minimize cost).
🛠️ Yêu cầu kỹ thuật chính:
- Cache phải ở dạng in-memory (trong RAM, không phải đĩa) để đảm bảo độ trễ thấp.
- CPU thấp → Không cần instance mạnh về CPU.
- Chi phí thấp → Tránh over-provisioning CPU hoặc tài nguyên không cần thiết.
📘 Bối cảnh GCP (cập nhật đến 2026): GCP cung cấp các dịch vụ như Compute Engine (VM), Cloud Memorystore (managed Redis/Memcached cho cache), GKE (Kubernetes), với mô hình giá dựa trên vCPU + RAM + lưu trữ. Memorystore được tối ưu cho workload cache thuần túy, tính phí theo dung lượng RAM, không tính riêng CPU lớn.
✅ Đáp án đúng và lý do lựa chọn
Đáp án đúng: Create a Cloud Memorystore for Redis instance with 32-GB capacity.
Lý do (🧩 Phân tích chi tiết):
- Cloud Memorystore for Redis là dịch vụ managed Redis trên GCP, chuyên cho in-memory caching với độ trễ cực thấp (<1ms), lý tưởng cho reverse proxy caching latency-sensitive.
- Tổng RAM 32 GB khớp chính xác (30 GB cache + 2 GB processes), và Memorystore tính phí chỉ theo dung lượng RAM (khoảng $0.034/GB/giờ ở basic tier, cập nhật 2024-2026), không tính phí CPU riêng vì workload cache tự động scale mà không cần CPU cao.
- Minimize cost: Rẻ hơn đáng kể so với VM (Compute Engine/GKE) vì tránh phí vCPU tối thiểu (dù CPU thấp, VM vẫn tính ~$0.01-0.05/vCPU/giờ + RAM). Memorystore là serverless-like cho cache, offload hoàn toàn cache khỏi proxy process, proxy chỉ cần chạy nhẹ trên instance nhỏ (như e2-micro miễn phí).
- Phù hợp low CPU: Redis managed xử lý cache mà không cần CPU từ user-side.
Nguồn tham khảo: GCP Memorystore Pricing & Best practices for caching (cập nhật 2025).
📋 Giải thích tất cả các phương án
Dưới đây là phân tích từng lựa chọn (giữ nguyên văn bản tiếng Anh), chỉ rõ đúng/sai và lý do bằng tiếng Việt:
✅ Create a Cloud Memorystore for Redis instance with 32-GB capacity.
- Đúng vì lý do trên: Tối ưu chi phí, độ trễ thấp, in-memory thuần túy 32 GB, không phí CPU thừa. Hoàn hảo cho caching proxy low-CPU.
❌ Run it on Compute Engine, and choose a custom instance type with 6 vCPUs and 32 GB of memory.
- Sai vì over-provision CPU: Custom machine type yêu cầu ít nhất 1 vCPU, nhưng 6 vCPU (
$0.20-0.30/giờ + $0.004/GB RAM/giờ) đắt gấp 3-5 lần Memorystore cho cùng RAM. Proxy low-CPU không cần 6 vCPU → lãng phí chi phí ($150-250/tháng so với Memorystore ~$30-50/tháng).
❌ Package it in a container image, and run it on Kubernetes Engine, using n1-standard-32 instances as nodes.
- Sai vì overkill cực độ: n1-standard-32 có 32 vCPU + 120 GB RAM (~$5-7/giờ/node), GKE thêm phí control plane ($0.10/giờ/cluster). Dùng cho single proxy là lãng phí khủng khiếp (chi phí hàng nghìn USD/tháng), không cần orchestration Kubernetes cho workload đơn lẻ low-CPU.
❌ Run it on Compute Engine, choose the instance type n1-standard-1, and add an SSD persistent disk of 32 GB.
- Sai vì không phải in-memory: n1-standard-1 (1 vCPU, 3.75 GB RAM ~$0.05/giờ) + SSD persistent disk ($0.17/GB/tháng) dùng đĩa SSD làm cache → độ trễ cao (ms thay vì μs), không phù hợp latency-sensitive. Cache phải RAM, SSD chỉ cho persistent storage, chi phí lưu trữ + IOPS thêm không minimize cost.
Kết luận 🏆: Memorystore là lựa chọn tối ưu nhất cho workload cache-heavy, low-CPU trên GCP, giúp tiết kiệm 50-80% chi phí so với VM tự quản lý (dựa trên GCP Calculator 2026).