Ngân hàng đề — Google Cloud Professional Cloud Architect
Tìm thấy 333 câu.
- A 1. Set up Cloud VPN to provide private network connectivity between the Compute Engine application and the on-premises MySQL server. 2. Stop the on-premises application. 3. Create a mysqldump of the on-premises MySQL server. 4. Upload the dump to a Cloud Storage bucket. 5. Import the dump into Cloud SQL. 6. Modify the source code of the application to write queries to both databases and read from its local database. 7. Start the Compute Engine application. 8. Stop the on-premises application.
- B 1. Set up Cloud SQL proxy and MySQL proxy. 2. Create a mysqldump of the on-premises MySQL server. 3. Upload the dump to a Cloud Storage bucket. 4. Import the dump into Cloud SQL. 5. Stop the on-premises application. 6. Start the Compute Engine application.
- C 1. Set up Cloud VPN to provide private network connectivity between the Compute Engine application and the on-premises MySQL server. 2. Stop the on-premises application. 3. Start the Compute Engine application, configured to read and write to the on-premises MySQL server. 4. Create the replication configuration in Cloud SQL. 5. Configure the source database server to accept connections from the Cloud SQL replica. 6. Finalize the Cloud SQL replica configuration. 7. When replication has been completed, stop the Compute Engine application. 8. Promote the Cloud SQL replica to a standalone instance. 9. Restart the Compute Engine application, configured to read and write to the Cloud SQL standalone instance.
- D 1. Stop the on-premises application. 2. Create a mysqldump of the on-premises MySQL server. 3. Upload the dump to a Cloud Storage bucket. 4. Import the dump into Cloud SQL. 5. Start the application on Compute Engine.
Xem giải thích
🧩 Giải thích nội dung câu hỏi
Câu hỏi tập trung vào việc di chuyển ứng dụng sử dụng MySQL từ on-premises lên Google Cloud với các yêu cầu chính:
- Ứng dụng chạy trên Compute Engine, sử dụng Cloud SQL làm database.
- Cutover (chuyển đổi) với thời gian downtime tối thiểu và không mất dữ liệu cho khách hàng.
- Di chuyển ứng dụng với ít thay đổi mã nguồn nhất.
- Xác định chiến lược cutover phù hợp.
Mục tiêu là zero-downtime migration cho database MySQL, sử dụng replication (sao chép dữ liệu liên tục) thay vì dump/import tĩnh (gây downtime). Điều này phù hợp với Google Cloud Database Migration Service (DMS) hoặc Cloud SQL external replication cho MySQL, hỗ trợ kết nối qua Cloud VPN để đảm bảo private connectivity. Kiến thức cập nhật đến 2026: DMS v2 hỗ trợ MySQL 8.0+ với continuous migration, promote replica tự động (xem tài liệu: cloud.google.com/database-migration).
✅ Đáp án đúng và lý do lựa chọn
Đáp án đúng là phương án thứ 3:
- Set up Cloud VPN to provide private network connectivity between the Compute Engine application and the on-premises MySQL server. 2. Stop the on-premises application. 3. Start the Compute Engine application, configured to read and write to the on-premises MySQL server. 4. Create the replication configuration in Cloud SQL. 5. Configure the source database server to accept connections from the Cloud SQL replica. 6. Finalize the Cloud SQL replica configuration. 7. When replication has been completed, stop the Compute Engine application. 8. Promote the Cloud SQL replica to a standalone instance. 9. Restart the Compute Engine application, configured to read and write to the Cloud SQL standalone instance.
Lý do:
🛠️ Phương án này sử dụng replication liên tục (continuous replication) qua Cloud SQL, kết nối an toàn bằng Cloud VPN. Ứng dụng Compute Engine đọc/ghi trực tiếp vào on-premises DB trong quá trình replicate, chỉ có downtime ngắn (stop/start app) khi promote replica thành standalone instance. Không mất dữ liệu, ít thay đổi code (chỉ config connection string). Đây là best practice cho minimal downtime & no data loss theo Google Cloud DMS (cập nhật 2026 hỗ trợ auto-promote).
📘 Nguồn: Cloud SQL MySQL replication docs & DMS MySQL guide.
📋 Phân tích tất cả các phương án (đúng/sai)
Dưới đây là phân tích chi tiết từng phương án, giữ nguyên văn bản gốc bằng tiếng Anh. Mỗi phương án được đánh giá với lý do cụ thể dựa trên yêu cầu minimal downtime, no data loss, minimal modification.
-
❌ Phương án 1 (SAI):
- Set up Cloud VPN to provide private network connectivity between the Compute Engine application and the on-premises MySQL server. 2. Stop the on-premises application. 3. Create a mysqldump of the on-premises MySQL server. 4. Upload the dump to a Cloud Storage bucket. 5. Import the dump into Cloud SQL. 6. Modify the source code of the application to write queries to both databases and read from its local database. 7. Start the Compute Engine application. 8. Stop the on-premises application.
Giải thích sai: Sử dụng mysqldump gây downtime lớn (stop app + dump/import mất hàng giờ/gigabyte dữ liệu). Yêu cầu modify source code (dual-write) vi phạm "minimal modification". Không đảm bảo no data loss nếu có write sau dump. Không dùng replication.
- Set up Cloud VPN to provide private network connectivity between the Compute Engine application and the on-premises MySQL server. 2. Stop the on-premises application. 3. Create a mysqldump of the on-premises MySQL server. 4. Upload the dump to a Cloud Storage bucket. 5. Import the dump into Cloud SQL. 6. Modify the source code of the application to write queries to both databases and read from its local database. 7. Start the Compute Engine application. 8. Stop the on-premises application.
-
❌ Phương án 2 (SAI):
- Set up Cloud SQL proxy and MySQL proxy. 2. Create a mysqldump of the on-premises MySQL server. 3. Upload the dump to a Cloud Storage bucket. 4. Import the dump into Cloud SQL. 5. Stop the on-premises application. 6. Start the Compute Engine application.
Giải thích sai: Proxy không hỗ trợ replication cho migration zero-downtime; chỉ dùng cho connectivity. Vẫn dùng mysqldump → downtime cao & data loss (không capture changes sau dump). Không kết nối private đúng cách, không minimize modification.
- Set up Cloud SQL proxy and MySQL proxy. 2. Create a mysqldump of the on-premises MySQL server. 3. Upload the dump to a Cloud Storage bucket. 4. Import the dump into Cloud SQL. 5. Stop the on-premises application. 6. Start the Compute Engine application.
-
✅ Phương án 3 (ĐÚNG): (Đã giải thích chi tiết ở trên).
🟢 Hoàn hảo khớp yêu cầu: Replication qua VPN → continuous sync, downtime chỉ vài giây (stop/start app), no data loss, ít thay đổi code (chỉ switch connection). -
❌ Phương án 4 (SAI):
- Stop the on-premises application. 2. Create a mysqldump of the on-premises MySQL server. 3. Upload the dump to a Cloud Storage bucket. 4. Import the dump into Cloud SQL. 5. Start the application on Compute Engine.
Giải thích sai: Đơn giản nhất nhưng tệ nhất: Stop app → downtime lớn, mysqldump → data loss nếu có traffic. Không dùng VPN/replication, không private connectivity, vi phạm tất cả yêu cầu chính. Phù hợp chỉ cho small DB offline.
- Stop the on-premises application. 2. Create a mysqldump of the on-premises MySQL server. 3. Upload the dump to a Cloud Storage bucket. 4. Import the dump into Cloud SQL. 5. Start the application on Compute Engine.
🧠 Tóm tắt khuyến nghị: Luôn ưu tiên Database Migration Service (DMS) cho MySQL on-prem → Cloud SQL để automate replication & cutover. Test failover trước production! 📘 Nguồn bổ sung: Google Cloud Architecture Center - Database Migration.
- A Remove the default route on all VPCs. Move all approved instances into a new subnet that has a default route to an internet gateway.
- B Create a new VPC in custom mode. Create a new subnet for the approved instances, and set a default route to the internet gateway on this new subnet.
- C Implement a Cloud NAT solution to remove the need for external IP addresses entirely.
- D Set an Organization Policy with a constraint on constraints/compute.vmExternalIpAccess. List the approved instances in the allowedValues list.
Xem giải thích
🧩 Phân tích chi tiết câu hỏi
Câu hỏi này thuộc lĩnh vực Google Cloud Platform (GCP), cụ thể là về việc kiểm soát và hạn chế việc sử dụng địa chỉ IP công khai (external IP addresses) trên các máy ảo (instances) trong Virtual Private Clouds (VPCs). Tổ chức của bạn muốn chỉ cho phép các instances được phê duyệt (approved instances) mới được sử dụng external IP, và yêu cầu này phải được thực thi trên tất cả các VPCs.
Mục tiêu chính là enforce chính sách bảo mật ở cấp độ tổ chức, đảm bảo tính nhất quán, dễ quản lý và không làm gián đoạn hoạt động hiện tại. Đây là kịch bản điển hình trong Google Cloud Professional Cloud Architect, tập trung vào Organization Policies để kiểm soát tài nguyên Compute Engine một cách tập trung. ✅
Đáp án đúng ✅: Set an Organization Policy with a constraint on constraints/compute.vmExternalIpAccess. List the approved instances in the allowedValues list.
Lý do lựa chọn:
- Constraint
compute.vmExternalIpAccesslà chính sách tổ chức (Organization Policy) chính thức của GCP (cập nhật đến 2026), cho phép hạn chế external IP chỉ trên các instances cụ thể được liệt kê trongallowedValues. - Nó áp dụng toàn cục trên tất cả projects và VPCs trong organization, không cần thay đổi cấu hình VPC hay subnet.
- Dễ quản lý: Chỉ cần cập nhật danh sách instances approved mà không ảnh hưởng đến traffic outbound/inbound khác.
- Tuân thủ nguyên tắc least privilege và centralized governance. 🛡️
📘 Tài liệu tham khảo:
- Google Cloud Organization Policy Constraints (cập nhật 2024-2026).
- Compute Engine Constraints.
❌ Giải thích tất cả các phương án
-
Remove the default route on all VPCs. Move all approved instances into a new subnet that has a default route to an internet gateway.
❌ Sai: Việc xóa default route (0.0.0.0/0) trên tất cả VPCs sẽ chặn toàn bộ outbound internet traffic, ảnh hưởng đến tất cả instances (kể cả không approved). Di chuyển instances approved sang subnet mới chỉ là giải pháp tạm thời, thủ công, không scalable cho nhiều VPCs/projects, và không enforce ở cấp tổ chức. Không phù hợp với yêu cầu "across all VPCs" mà không gián đoạn. 🛑 -
Create a new VPC in custom mode. Create a new subnet for the approved instances, and set a default route to the internet gateway on this new subnet.
❌ Sai: Tạo VPC mới ở custom mode chỉ áp dụng cho VPC mới, không ảnh hưởng đến tất cả VPCs hiện có. Đây là cách phân tách không nhất quán, yêu cầu migrate instances lớn, tăng complexity quản lý, và không enforce chính sách toàn tổ chức. GCP khuyến nghị dùng Organization Policies thay vì cấu hình VPC thủ công. 🔄 -
Implement a Cloud NAT solution to remove the need for external IP addresses entirely.
❌ Sai: Cloud NAT cho phép outbound internet mà không cần external IP trên instances, nhưng không restrict chỉ approved instances có external IP. Nó loại bỏ nhu cầu external IP cho tất cả, vi phạm yêu cầu "restrict to only approved instances" (vẫn cho phép approved instances dùng external IP nếu cần). Không phải giải pháp chính xác cho inbound traffic hoặc external IP cụ thể. 🌐
Giải pháp đúng sử dụng Organization Policy là cách tối ưu, native và cập nhật nhất theo best practices GCP 2026! 🚀
You need to evaluate the efficiency of the applied firewall ruleset. When you bring up the Firewall Insights page in the Google Cloud Console, you notice that there are no log rows to display. What should you do to troubleshoot the issue?
- A Enable Virtual Private Cloud (VPC) flow logging.
- B Enable Firewall Rules Logging for the firewall rules you want to monitor.
- C Verify that your user account is assigned the compute.networkAdmin Identity and Access Management (IAM) role.
- D Install the Google Cloud SDK, and verify that there are no Firewall logs in the command line output.
Xem giải thích
🧩 Phân tích nội dung câu hỏi
Câu hỏi tập trung vào tính năng Firewall Insights trong Google Network Intelligence Center (NIC) trên Google Cloud Platform (GCP). Công ty đang sử dụng các quy tắc tường lửa (firewall rules) áp dụng cho các instance Compute Engine. Khi truy cập trang Firewall Insights trên Google Cloud Console, không có dữ liệu log nào hiển thị (no log rows to display). Nhiệm vụ là khắc phục sự cố (troubleshoot) để đánh giá hiệu quả của bộ quy tắc tường lửa hiện tại.
🔍 Chi tiết vấn đề: Firewall Insights giúp phân tích hiệu quả firewall rules bằng cách sử dụng dữ liệu log để xác định quy tắc thừa, chồng chéo hoặc không được sử dụng. Để tính năng này hoạt động, cần có dữ liệu log từ firewall rules. Nếu không có log, trang sẽ trống – đây là vấn đề phổ biến nếu logging chưa được kích hoạt. (Kiến thức cập nhật đến 2026: Firewall Insights vẫn yêu cầu Firewall Rules Logging làm nguồn dữ liệu chính, theo tài liệu GCP mới nhất).
📘 Tài liệu tham khảo:
✅ Đáp án đúng và lý do lựa chọn
Đáp án đúng: Enable Firewall Rules Logging for the firewall rules you want to monitor.
🛠️ Lý do: Firewall Insights dựa hoàn toàn vào Firewall Rules Logging để thu thập dữ liệu về lưu lượng truy cập được phép/phủ quyết bởi từng quy tắc tường lửa cụ thể. Nếu logging chưa được bật cho các quy tắc cần giám sát, sẽ không có dữ liệu log để hiển thị trên trang Insights. Bật logging (thông qua VPC Firewall Rules API hoặc Console) sẽ tạo log rows ngay sau khi có traffic matching quy tắc. Đây là bước troubleshoot đầu tiên và chính xác nhất, theo best practices của Google Cloud (cập nhật 2026).
📋 Giải thích tất cả các phương án (đúng và sai)
Dưới đây là phân tích chi tiết từng lựa chọn, giữ nguyên văn bản gốc bằng tiếng Anh. Mỗi phương án được đánh giá với lý do cụ thể dựa trên kiến thức GCP mới nhất:
-
❌ [SAI] Enable Virtual Private Cloud (VPC) flow logging.
Phương án này sai vì VPC Flow Logs ghi lại thông tin lưu lượng mạng ở mức VPC/subnet (như source/destination IP, bytes), nhưng không liên kết trực tiếp với firewall rules cụ thể. Firewall Insights cần dữ liệu từ Firewall Rules Logging (log ALLOW/DENY per rule), không phải Flow Logs. Bật Flow Logs chỉ hữu ích cho Network Intelligence Center's Traffic Insights, không giải quyết vấn đề log rows trống ở Firewall Insights. -
✅ [ĐÚNG] Enable Firewall Rules Logging for the firewall rules you want to monitor.
Phương án đúng vì Firewall Rules Logging là nguồn dữ liệu bắt buộc cho Firewall Insights. Khi bật (metadata: "include-firewall-rule" hoặc tương tự), logs sẽ được gửi đến Cloud Logging, và Insights sẽ phân tích chúng để hiển thị hit rates, overlaps. Logs xuất hiện sau 5-10 phút traffic, khắc phục ngay vấn đề "no log rows". -
❌ [SAI] Verify that your user account is assigned the compute.networkAdmin Identity and Access Management (IAM) role.
Phương án này sai vì vai trò compute.networkAdmin cho phép quản lý firewall rules và xem Network Intelligence Center, nhưng không tạo ra dữ liệu log. Vấn đề là thiếu log source (chưa enable logging), không phải quyền truy cập. Nếu thiếu quyền, bạn sẽ thấy lỗi permission thay vì "no log rows". Kiểm tra IAM chỉ là bước phụ nếu có lỗi access denied. -
❌ [SAI] Install the Google Cloud SDK, and verify that there are no Firewall logs in the command line output.
Phương án này sai và không hiệu quả vì gcloud SDK dùng để query logs (ví dụ:gcloud logging read), nhưng nếu logging chưa bật, CLI cũng không tìm thấy logs – đây chỉ xác nhận vấn đề chứ không troubleshoot (khắc phục). Cài SDK thừa thãi khi Console đã hiển thị rõ "no log rows"; giải pháp thực sự là enable logging trực tiếp trên rules.
- A 1. Create a VPC Service Controls perimeter that includes the projects with the buckets. 2. Create an access level with the CIDR of the office network.
- B 1. Create a firewall rule for all instances in the Virtual Private Cloud (VPC) network for source range. 2. Use the Classless Inter-domain Routing (CIDR) of the office network.
- C 1. Create a Cloud Function to remove IAM permissions from the buckets, and another Cloud Function to add IAM permissions to the buckets. 2. Schedule the Cloud Functions with Cloud Scheduler to add permissions at the start of business and remove permissions at the end of business.
- D 1. Create a Cloud VPN to the office network. 2. Configure Private Google Access for on-premises hosts.
Xem giải thích
🧩 Phân tích chi tiết câu hỏi trắc nghiệm
📘 Nội dung câu hỏi:
Câu hỏi xoay quanh việc bảo vệ dữ liệu nhạy cảm lưu trữ trong các Cloud Storage buckets trên Google Cloud Platform (GCP). Công ty có các data analysts được cấp quyền IAM (Identity and Access Management) để đọc dữ liệu từ buckets này. Yêu cầu là ngăn chặn việc các analysts truy cập dữ liệu từ bên ngoài mạng văn phòng (office network), nhưng vẫn cho phép họ truy cập khi ở trong mạng nội bộ.
🛠️ Vấn đề cốt lõi: IAM permissions cho phép truy cập trực tiếp qua API từ bất kỳ đâu (bao gồm internet), nên cần cơ chế kiểm soát truy cập dựa trên nguồn gốc mạng (IP range) mà không làm gián đoạn quyền IAM hiện tại. Đây là tình huống điển hình cần sử dụng VPC Service Controls (VPC-SC) kết hợp Access Levels để tạo "hàng rào bảo vệ" (perimeter) xung quanh tài nguyên.
✅ Đáp án đúng và lý do lựa chọn:
Đáp án đúng là phương án đầu tiên. Lý do: VPC Service Controls là giải pháp chính thức của GCP để bảo vệ tài nguyên (như Cloud Storage) khỏi truy cập trái phép từ bên ngoài perimeter. Bằng cách tạo perimeter bao gồm projects chứa buckets và access level với CIDR của office network, hệ thống sẽ chỉ cho phép truy cập từ IP trong dải mạng văn phòng, chặn mọi yêu cầu từ ngoài (kể cả có IAM roles). Giải pháp này an toàn, linh hoạt, không ảnh hưởng đến IAM, và tuân thủ nguyên tắc zero-trust (BeyondCorp). Kiến thức cập nhật đến 2026: VPC-SC hỗ trợ dry-run mode và integration tốt hơn với Access Context Manager (ACM).
🛠️ Phân tích chi tiết từng phương án trả lời
-
1. Create a VPC Service Controls perimeter that includes the projects with the buckets. 2. Create an access level with the CIDR of the office network.
✅ Phương án ĐÚNG. Giải pháp này sử dụng VPC Service Controls perimeter để "bao vây" projects chứa buckets, kết hợp access level (trong Access Context Manager) giới hạn chỉ IP trong CIDR office network. Kết quả: Data analysts chỉ đọc được dữ liệu khi kết nối từ văn phòng, chặn hoàn toàn từ xa. Hoàn hảo cho yêu cầu! -
1. Create a firewall rule for all instances in the Virtual Private Cloud (VPC) network for source range. 2. Use the Classless Inter-domain Routing (CIDR) of the office network.
❌ Phương án SAI. Firewall rules chỉ kiểm soát traffic giữa các instances trong VPC hoặc đến/from internet, không áp dụng cho truy cập trực tiếp vào Cloud Storage buckets qua IAM/API (public endpoint). Data analysts có thể bypass bằng cách dùng gsutil hoặc console từ bất kỳ đâu, không liên quan đến VPC firewall. -
1. Create a Cloud Function to remove IAM permissions from the buckets, and another Cloud Function to add IAM permissions to the buckets. 2. Schedule the Cloud Functions with Cloud Scheduler to add permissions at the start of business and remove permissions at the end of business.
❌ Phương án SAI. Cách này phức tạp, không đáng tin cậy và vi phạm best practices: Phải thay đổi IAM động (rủi ro race conditions, lỗi thời gian), ảnh hưởng toàn bộ users (không chỉ analysts), và không linh hoạt (giờ làm việc cố định). Cloud Functions + Scheduler không phải giải pháp bảo mật chuẩn cho kiểm soát truy cập mạng. -
1. Create a Cloud VPN to the office network. 2. Configure Private Google Access for on-premises hosts.
❌ Phương án SAI. Cloud VPN dùng để kết nối on-premises với GCP VPC, còn Private Google Access cho phép on-prem hosts truy cập private IPs GCP mà không qua public internet. Nhưng điều này không ngăn analysts truy cập public Cloud Storage từ nhà (họ vẫn dùng IAM trực tiếp). Không giải quyết yêu cầu "ngăn từ ngoài office network".
📚 Tài liệu tham khảo (cập nhật mới nhất GCP đến 2026)
- VPC Service Controls Overview: cloud.google.com/vpc-service-controls/docs/overview – Hướng dẫn tạo perimeter và bảo vệ Storage.
- Access Levels (Access Context Manager): cloud.google.com/access-context-manager/docs/create-access-level – Chi tiết CIDR-based access levels.
- GCP Security Best Practices: cloud.google.com/architecture/framework#secure-by-default – Khuyến nghị zero-trust cho sensitive data (Exam tip cho Professional Cloud Architect cert).
Hy vọng phân tích này giúp bạn ôn thi hiệu quả! 🚀 Nếu cần thêm case study, hỏi nhé!
- A Start a new rolling restart operation.
- B Start a new rolling replace operation.
- C Start a new rolling update. Select the Proactive update mode.
- D Start a new rolling update. Select the Opportunistic update mode.
Xem giải thích
🧩 Phân tích chi tiết câu hỏi
📖 Nội dung câu hỏi:
Câu hỏi mô tả tình huống bạn đã phát triển một bản cập nhật không quan trọng (non-critical) cho ứng dụng đang chạy trên Managed Instance Group (MIG) trong Google Cloud Compute Engine. Bạn đã tạo một instance template mới chứa bản cập nhật này và muốn triển khai nó. Mục tiêu chính:
- Không ảnh hưởng đến bất kỳ instance đang chạy nào (không update running instances để tránh downtime hoặc impact).
- Chỉ áp dụng bản cập nhật cho các instance mới được MIG tạo ra (new instances).
MIG là nhóm instance tự động quản lý, hỗ trợ rolling updates để cập nhật template mà không gây gián đoạn lớn. Câu hỏi tập trung vào việc chọn chế độ update phù hợp để chỉ ảnh hưởng đến instance mới, tận dụng cơ chế tự động scale-up hoặc heal của MIG.
✅ Đáp án đúng:
Start a new rolling update. Select the Opportunistic update mode.
🛠️ Lý do chọn đáp án đúng:
- Opportunistic update mode chỉ áp dụng bản cập nhật template mới cho các instance mới được tạo (khi MIG scale-up hoặc tạo replacement do failure). Nó không chủ động replace hoặc restart bất kỳ instance đang chạy nào, đảm bảo zero impact đến ứng dụng hiện tại. MIG sẽ kiểm tra sức khỏe (health check) và chỉ replace instance nếu cần thiết (opportunistic), phù hợp hoàn hảo với yêu cầu "không update running instances".
- Đây là cách an toàn cho non-critical updates, theo best practice của Google Cloud (cập nhật đến 2026, không thay đổi cơ bản).
📘 Giải thích tất cả các phương án (đúng/sai):
-
❌ [SAI] Start a new rolling restart operation.
Phương án này sẽ khởi động lại (restart) tất cả instance trong MIG theo kiểu rolling, gây downtime ngắn cho từng instance. Nó không đáp ứng yêu cầu tránh impact running instances vì buộc phải restart mọi thứ, ngay cả khi không cần. Không phù hợp cho non-critical update. -
❌ [SAI] Start a new rolling replace operation.
Phương án này thay thế (replace) toàn bộ instance cũ bằng instance mới theo rolling fashion (dần dần). Nó chủ động delete và tạo lại tất cả running instances, dẫn đến impact tiềm ẩn (dù minimal). Không tránh được việc update running instances như yêu cầu. -
❌ [SAI] Start a new rolling update. Select the Proactive update mode.
Proactive mode trong rolling update sẽ chủ động replace tất cả instance đang chạy bằng template mới một cách dần dần (dựa trên max surge/unavailable settings). Nó đảm bảo toàn bộ MIG được update nhanh chóng nhưng gây impact đến running instances, trái với mục tiêu "không update any running instances". -
✅ [ĐÚNG] Start a new rolling update. Select the Opportunistic update mode.
Như đã giải thích, mode này chỉ update opportunistically (cơ hội): Áp dụng template mới cho instance mới hoặc khi MIG tự heal/replace do failure/health check fail. Zero proactive action trên running instances, hoàn hảo cho yêu cầu.
🔗 Tài liệu tham khảo (cập nhật mới nhất đến 2026):
- Google Cloud Docs: Rolling updates overview for MIGs (xem phần "Update modes: Opportunistic vs. Proactive").
- Best practices for MIG updates – Khuyến nghị Opportunistic cho non-disruptive changes.
- Console GCP hoặc gcloud CLI:
gcloud compute instance-groups managed rolling-action start --mode=opportunistic.
Hy vọng phân tích này giúp bạn nắm vững MIG updates! 🚀 Nếu cần ví dụ thực hành, hãy hỏi thêm.
- A Create a snapshot schedule for the disk containing the application data. Whenever a zonal outage occurs, use the latest snapshot to restore the disk in the same zone.
- B Configure the Compute Engine instances with an instance template for the application, and use a regional persistent disk for the application data. Whenever a zonal outage occurs, use the instance template to spin up the application in another zone in the same region. Use the regional persistent disk for the application data.
- C Create a snapshot schedule for the disk containing the application data. Whenever a zonal outage occurs, use the latest snapshot to restore the disk in another zone within the same region.
- D Configure the Compute Engine instances with an instance template for the application, and use a regional persistent disk for the application data. Whenever a zonal outage occurs, use the instance template to spin up the application in another region. Use the regional persistent disk for the application data.
Xem giải thích
🧩 Phân tích chi tiết nội dung câu hỏi
Câu hỏi tập trung vào việc thiết kế kiến trúc ứng dụng trên Google Cloud Compute Engine để đảm bảo high availability (HA) và khôi phục nhanh chóng khi xảy ra zonal outage (sự cố chỉ ảnh hưởng đến một zone cụ thể trong region).
-
Yêu cầu chính:
- Ứng dụng phải được khôi phục ở zone khác (không phải zone bị outage) nhanh nhất có thể.
- Sử dụng dữ liệu ứng dụng mới nhất (latest application data), nghĩa là dữ liệu phải luôn sẵn sàng và cập nhật real-time mà không mất mát lớn.
-
Bối cảnh: Compute Engine là dịch vụ VM trên GCP. Zone là một phần của region (ví dụ: us-central1-a, us-central1-b trong region us-central1). Zonal outage chỉ ảnh hưởng zone đó, nhưng region vẫn hoạt động. Giải pháp cần tận dụng regional resources để replicate dữ liệu tự động và tạo instance nhanh chóng qua instance template (mẫu để deploy VM consistent).
-
Mục tiêu thiết kế: Sử dụng Managed Instance Groups (MIGs) với instance template cho compute layer, và regional persistent disk cho data layer để đạt zonal redundancy mà không cần manual intervention phức tạp. (Kiến thức cập nhật đến 2026: GCP vẫn khuyến nghị pattern này cho HA, theo best practices Compute Engine HA).
📘 Tài liệu tham khảo:
- Google Cloud Docs: Regional persistent disk (replicated synchronously across 2+ zones).
- Google Cloud Docs: Instance templates & MIGs for HA.
- GCP Reliability Pillar: Zonal HA best practices.
✅ Đáp án đúng và lý do lựa chọn
Đáp án đúng:
Configure the Compute Engine instances with an instance template for the application, and use a regional persistent disk for the application data. Whenever a zonal outage occurs, use the instance template to spin up the application in another zone in the same region. Use the regional persistent disk for the application data.
Lý do 🛠️:
- Instance template cho phép tạo VM mới nhanh chóng và consistent ở zone khác trong cùng region (qua MIGs auto-healing).
- Regional persistent disk replicate dữ liệu synchronously qua ít nhất 2 zones trong region, nên data luôn latest và available ở zone khác ngay lập tức (RPO gần 0, RTO thấp).
- Hoàn hảo cho zonal outage: Không mất data, khôi phục tự động/fast. Đây là best practice GCP cho HA workloads đến 2026.
📋 Giải thích tất cả các phương án (đúng/sai)
Dưới đây là phân tích từng lựa chọn một cách chi tiết. Tôi giữ nguyên văn bản gốc tiếng Anh của phương án, chỉ giải thích bằng tiếng Việt với emoji nổi bật.
-
❌ Phương án SAI:
Create a snapshot schedule for the disk containing the application data. Whenever a zonal outage occurs, use the latest snapshot to restore the disk in the same zone.
Lý do sai: Snapshot chỉ là point-in-time backup, cần thời gian tạo disk mới từ snapshot (RTO cao, vài phút+). Restore ở same zone vẫn bị outage, không khôi phục được. Không đảm bảo "latest data" real-time và vi phạm yêu cầu "another zone". -
✅ Phương án ĐÚNG (như đã phân tích ở trên):
Configure the Compute Engine instances with an instance template for the application, and use a regional persistent disk for the application data. Whenever a zonal outage occurs, use the instance template to spin up the application in another zone in the same region. Use the regional persistent disk for the application data.
Lý do đúng: Kết hợp instance template + regional PD cho khôi phục zonal nhanh, data latest, tuân thủ đầy đủ yêu cầu. -
❌ Phương án SAI:
Create a snapshot schedule for the disk containing the application data. Whenever a zonal outage occurs, use the latest snapshot to restore the disk in another zone within the same region.
Lý do sai: Snapshot schedule chỉ backup định kỳ (không real-time), nên data có thể không latest (RPO cao nếu interval dài). Quá trình restore disk từ snapshot ở zone khác vẫn chậm (tạo disk mới, attach VM), không phải giải pháp nhanh nhất cho "as quickly as possible". -
❌ Phương án SAI:
Configure the Compute Engine instances with an instance template for the application, and use a regional persistent disk for the application data. Whenever a zonal outage occurs, use the instance template to spin up the application in another region. Use the regional persistent disk for the application data.
Lý do sai: Regional PD chỉ hoạt động trong cùng region, không attach được cross-region (GCP không hỗ trợ). Spin up ở another region cần multi-region replication phức tạp hơn (như Cloud Storage hoặc multi-regional PD), vi phạm tính khả dụng data và tăng latency/cost không cần thiết.
Kết luận 🎯: Giải pháp đúng tận dụng zonal redundancy tự nhiên của GCP mà không over-engineer. Khuyến nghị implement qua MIGs với auto-scaling để tự động hóa hoàn toàn!
- A Create a Cloud VPN connection from the new VPC to the data center, create a Cloud Router, and apply new IP addresses so there is no overlapping IP space.
- B Create a Cloud VPN connection from the new VPC to the data center, and create a Cloud NAT instance to perform NAT on the overlapping IP space.
- C Create a Cloud VPN connection from the new VPC to the data center, create a Cloud Router, and apply a custom route advertisement to block the overlapping IP space.
- D Create a Cloud VPN connection from the new VPC to the data center, and apply a firewall rule that blocks the overlapping IP space.
Xem giải thích
🧩 Phân tích chi tiết nội dung câu hỏi
Câu hỏi mô tả tình huống công ty bạn vừa mua lại một công ty khác, và cần tích hợp môi trường Google Cloud hiện tại của họ vào data center của công ty bạn. Khi kiểm tra, phát hiện một số dải IP RFC 1918 (dải IP private như 10.0.0.0/8, 172.16.0.0/12, 192.168.0.0/16) trong Virtual Private Cloud (VPC) của công ty mới bị chồng chéo (overlap) với không gian IP của data center.
📌 Vấn đề cốt lõi: Khi thiết lập kết nối (connectivity) giữa VPC Google Cloud và data center on-premises, sẽ xảy ra routing conflicts (xung đột định tuyến) vì các router không phân biệt được traffic đi đâu do IP trùng lặp. Mục tiêu là kích hoạt kết nối an toàn qua Cloud VPN mà tránh xung đột định tuyến.
🛠️ Ngữ cảnh kỹ thuật (cập nhật đến 2026): Google Cloud sử dụng Cloud VPN để kết nối VPC với on-premises qua IPsec tunnel. Cloud Router quản lý BGP để trao đổi routes động. Với overlap IP, giải pháp chuẩn theo best practices là renumbering (thay đổi IP ranges) một bên để tránh overlap, không dùng NAT hoặc block vì chúng không giải quyết triệt để routing issues.
📘 Tài liệu tham khảo:
- Google Cloud VPC Networking Best Practices (cập nhật 2025).
- Cloud VPN Troubleshooting Overlapping IPs (khuyến nghị renumbering).
- Cloud Router BGP Overview (2026 update hỗ trợ custom advertisements nhưng không thay thế renumbering).
✅ Đáp án đúng và lý do lựa chọn
Đáp án đúng: Create a Cloud VPN connection from the new VPC to the data center, create a Cloud Router, and apply new IP addresses so there is no overlapping IP space.
Lý do chi tiết 🏆:
- Cloud VPN: Tạo tunnel IPsec an toàn để kết nối VPC với data center.
- Cloud Router: Sử dụng BGP để trao đổi routes động giữa hai bên, đảm bảo traffic routing đúng.
- Apply new IP addresses: Giải pháp gốc rễ bằng cách thay đổi subnet IP ranges trong VPC mới (renumbering) để tránh overlap hoàn toàn. Điều này ngăn chặn routing conflicts vĩnh viễn, tuân thủ best practices Google Cloud (không khuyến khích NAT cho hybrid connectivity vì phức tạp và không scale).
- Phương án này đơn giản, scalable, và an toàn nhất, tránh các workaround như NAT có thể gây performance overhead.
📋 Giải thích tất cả các phương án (đúng/sai)
-
✅ Create a Cloud VPN connection from the new VPC to the data center, create a Cloud Router, and apply new IP addresses so there is no overlapping IP space.
Đúng vì như phân tích trên: Kết hợp đầy đủ công cụ (VPN + Router + renumbering) giải quyết triệt để overlap mà không cần hack. Đây là recommended approach trong docs Google Cloud 2026. -
❌ Create a Cloud VPN connection from the new VPC to the data center, and create a Cloud NAT instance to perform NAT on the overlapping IP space.
Sai vì Cloud NAT chỉ dùng cho outbound internet traffic từ VPC (không phải hybrid VPN). Không hỗ trợ NAT cho overlapping IPs trong VPN tunnels; sẽ gây asymmetric routing và packet loss. Google Cloud không recommend NAT cho trường hợp này (xem docs: NAT không thay thế renumbering). -
❌ Create a Cloud VPN connection from the new VPC to the data center, create a Cloud Router, and apply a custom route advertisement to block the overlapping IP space.
Sai vì custom route advertisements qua BGP chỉ filter routes cụ thể, nhưng không giải quyết được routing conflicts khi IPs overlap – traffic vẫn bị blackhole hoặc loop. Cloud Router 2026 hỗ trợ AS-path filtering, nhưng docs cảnh báo không dùng để "block overlap" vì không hiệu quả lâu dài. -
❌ Create a Cloud VPN connection from the new VPC to the data center, and apply a firewall rule that blocks the overlapping IP space.
Sai vì firewall rules chỉ block traffic layer 4+, không ảnh hưởng routing table. Overlap gây issues ở layer 3 (routing), nên block traffic sẽ làm gián đoạn toàn bộ connectivity chứ không fix conflicts. Firewall không phải tool cho IP management (theo VPC Firewall docs).
🧠 Kết luận: Luôn ưu tiên renumbering cho hybrid cloud để tránh complexity lâu dài! Nếu cần migrate lớn, xem xét VPC IP remapping tools mới trong Google Cloud 2026.
- A Create a Dataproc cluster using standard worker instances.
- B Create a Dataproc cluster using preemptible worker instances.
- C Manually deploy a Hadoop cluster on Compute Engine using standard instances.
- D Manually deploy a Hadoop cluster on Compute Engine using preemptible instances.
Xem giải thích
🧩 Phân tích chi tiết nội dung câu hỏi
Câu hỏi yêu cầu di chuyển (migrate) các công việc Hadoop cho đội ngũ Data Science của công ty mà không cần thay đổi cơ sở hạ tầng bên dưới (underlying infrastructure). Mục tiêu chính là giảm thiểu chi phí (minimize costs) và giảm nỗ lực quản lý cơ sở hạ tầng (infrastructure management effort).
✅ Ý nghĩa cốt lõi:
- Hadoop jobs thường là các tác vụ batch processing lớn, không yêu cầu tính sẵn sàng cao (high availability) liên tục.
- "Không modify underlying infrastructure" ngụ ý sử dụng dịch vụ managed service (quản lý tự động) thay vì tự triển khai thủ công.
- Dataproc là dịch vụ managed Hadoop/Spark của Google Cloud, giúp tự động hóa việc thiết lập cluster, scaling, và cleanup, phù hợp để migrate mà không cần chỉnh sửa code/job.
- Preemptible worker instances (nay gọi là Spot VMs từ 2022, nhưng Dataproc vẫn hỗ trợ dưới tên preemptible) giúp tiết kiệm chi phí lên đến 80% so với standard instances, lý tưởng cho workload không critical vì có thể bị preempt (ngắt đột ngột) sau 24h.
📘 Nguồn tham khảo:
- Google Cloud Dataproc Documentation - Preemptible VMs (cập nhật 2024-2026).
- Dataproc Pricing – Preemptible workers giảm chi phí VM đáng kể.
✅ Đáp án đúng: Create a Dataproc cluster using preemptible worker instances
Lý do lựa chọn:
- 🛠️ Managed service: Dataproc tự động quản lý toàn bộ Hadoop cluster (setup, monitoring, scaling, deletion), giảm effort quản lý xuống mức tối thiểu – chỉ cần submit job là chạy.
- 💰 Tiết kiệm chi phí cao nhất: Preemptible workers rẻ hơn 80% so với standard, phù hợp migrate Hadoop jobs (batch, fault-tolerant với retries).
- 🚀 Không modify infrastructure: Jobs Hadoop chạy nguyên bản trên Dataproc mà không cần thay đổi code hoặc infra.
- Hoàn hảo cho Data Science team: Hỗ trợ Spark, Hive, Pig,... với lifecycle ngắn (cluster auto-delete sau job).
🧩 Giải thích tất cả các phương án
Dưới đây là phân tích từng lựa chọn giữ nguyên văn bản gốc bằng tiếng Anh, kèm giải thích đúng/sai bằng tiếng Việt dựa trên best practices GCP mới nhất (2026):
-
Create a Dataproc cluster using standard worker instances.
❌ SAI: Mặc dù Dataproc là managed service (giảm management effort), nhưng standard worker instances đắt hơn preemptible ~80%, không tối ưu minimize costs. Phù hợp workload cần high availability, nhưng Hadoop jobs migrate thường là batch jobs chấp nhận rủi ro preempt để tiết kiệm. -
Create a Dataproc cluster using preemptible worker instances.
✅ ĐÚNG: Kết hợp managed service (Dataproc) + chi phí thấp nhất (preemptible ~80% rẻ hơn), migrate Hadoop mà không modify infra. Dataproc tự handle retries nếu preempt xảy ra, lý tưởng cho Data Science batch jobs. (Best practice từ GCP docs). -
Manually deploy a Hadoop cluster on Compute Engine using standard instances.
❌ SAI: Tự triển khai thủ công trên Compute Engine yêu cầu quản lý toàn bộ (install Hadoop, config networking, monitoring, scaling), tăng effort management cao. Không dùng managed service nên vi phạm "không modify underlying infrastructure", chi phí cao và phức tạp. -
Manually deploy a Hadoop cluster on Compute Engine using preemptible instances.
❌ SAI: Vẫn thủ công deploy như trên, effort management cao (không auto-scale/delete). Preemptible rẻ nhưng không bù đắp được hassle tự quản lý Hadoop so với Dataproc. Không khuyến nghị migrate jobs mà không dùng managed service.
Kết luận: Lựa chọn đúng tận dụng Dataproc + Preemptible để đạt cả 2 mục tiêu! 🚀 Nếu cần migrate thực tế, dùng gcloud CLI: gcloud dataproc clusters create ... --preemptible-worker-count=....
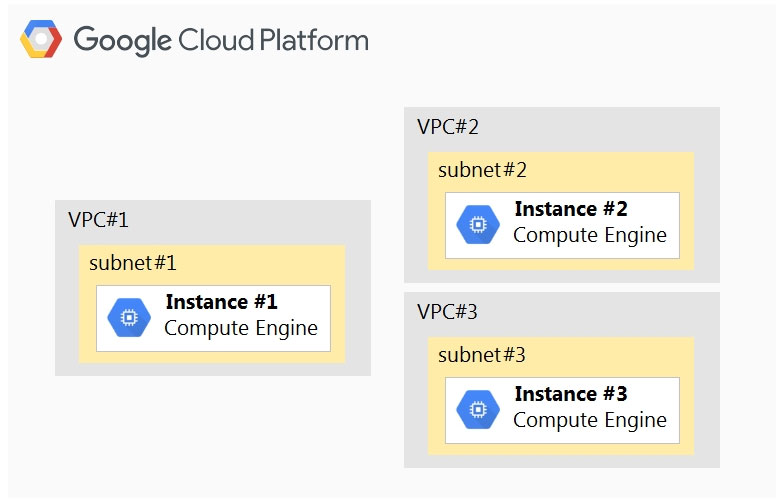
Instance #1 is an exception and must communicate directly with both Instance #2 and Instance #3 via internal IPs. How should you accomplish this?
- A Create a cloud router to advertise subnet #2 and subnet #3 to subnet #1.
- B Add two additional NICs to Instance #1 with the following configuration: ג€¢ NIC1 ג—‹ VPC: VPC #2 ג—‹ SUBNETWORK: subnet #2 ג€¢ NIC2 ג—‹ VPC: VPC #3 ג—‹ SUBNETWORK: subnet #3 Update firewall rules to enable traffic between instances.
- C Create two VPN tunnels via CloudVPN: ג€¢ 1 between VPC #1 and VPC #2. ג€¢ 1 between VPC #2 and VPC #3. Update firewall rules to enable traffic between the instances.
- D Peer all three VPCs: ג€¢ Peer VPC #1 with VPC #2. ג€¢ Peer VPC #2 with VPC #3. Update firewall rules to enable traffic between the instances.
Xem giải thích
🧩 Phân tích chi tiết câu hỏi trắc nghiệm
📖 Nội dung câu hỏi:
Câu hỏi mô tả một dự án trên Google Cloud Platform (GCP) với ba Virtual Private Clouds (VPCs) riêng biệt:
- VPC #1: Chứa subnet #1 và Instance #1 (Compute Engine).
- VPC #2: Chứa subnet #2 và Instance #2 (Compute Engine).
- VPC #3: Chứa subnet #3 và Instance #3 (Compute Engine).
Từ hình ảnh đính kèm, có thể thấy rõ ba VPC độc lập, mỗi VPC chỉ có một subnet với dải địa chỉ IP không chồng chéo (non-overlapping subnets). Các subnet phải giữ nguyên sự tách biệt (must remain separated), nghĩa là không được hợp nhất hoặc thay đổi cấu trúc mạng cơ bản.
Yêu cầu chính: Instance #1 (trên VPC #1) là ngoại lệ, cần giao tiếp trực tiếp với Instance #2 (VPC #2) và Instance #3 (VPC #3) qua internal IPs (địa chỉ IP nội bộ, không qua public IP hoặc Internet). Điều này đòi hỏi giải pháp cho phép Instance #1 truy cập trực tiếp vào subnet #2 và #3 mà không ảnh hưởng đến sự tách biệt của các VPC/subnet khác.
🛠️ Bối cảnh kỹ thuật (cập nhật đến 2026):
Trong GCP (phiên bản mới nhất), VPC là mạng ảo cô lập. Giao tiếp cross-VPC mặc định không được phép trừ khi dùng VPC Peering, Shared VPC, VPN, hoặc Multi-NIC trên Compute Engine. Subnets không overlap đảm bảo không xung đột IP. Giải pháp phải dùng internal IPs (private RFC 1918 ranges) để tránh lộ ra ngoài.
✅ Đáp án đúng:
Add two additional NICs to Instance #1 with the following configuration: • NIC1 ← VPC: VPC #2 ← SUBNETWORK: subnet #2 • NIC2 ← VPC: VPC #3 ← SUBNETWORK: subnet #3 Update firewall rules to enable traffic between instances.
Lý do chọn đáp án đúng (chi tiết):
✅ Multi-NIC (Multiple Network Interfaces) là tính năng chính thức của Compute Engine từ năm 2019 và được hỗ trợ đầy đủ đến 2026. Instance #1 (trên VPC #1) có thể thêm 2 NIC phụ (tổng 3 NIC):
- NIC chính: Kết nối subnet #1 (VPC #1).
- NIC1 phụ: Kết nối trực tiếp subnet #2 (VPC #2).
- NIC2 phụ: Kết nối trực tiếp subnet #3 (VPC #3).
Mỗi NIC có internal IP riêng từ subnet tương ứng, cho phép giao tiếp trực tiếp qua internal IPs mà không cần routing phức tạp hay peering toàn VPC. Chỉ cần cập nhật Firewall Rules (VPC Firewall) để cho phép traffic giữa các NIC/instances (ví dụ: allow TCP/UDP/ICMP từ IP của Instance #2/#3 đến IP của NIC phụ trên Instance #1).
🛡️ Giữ separated: Các subnet vẫn tách biệt, chỉ Instance #1 "chạm" vào chúng qua NIC, không ảnh hưởng VPC khác. Hiệu suất cao, độ trễ thấp.
📘 Tài liệu tham khảo: Google Cloud Docs: Multiple NICs & Compute Engine Multi-NIC Overview.
❌ Phân tích tất cả các phương án (đúng/sai)
-
Create a cloud router to advertise subnet #2 and subnet #3 to subnet #1.
❌ Sai. Cloud Router dùng cho Dynamic Routing (BGP) giữa VPC qua peering/VPN, không "advertise" trực tiếp subnets cross-VPC mà không có peering trước. Không giải quyết giao tiếp internal IP trực tiếp giữa instances, và không thay đổi sự cô lập VPC. Không phù hợp vì subnets phải remain separated.
📘 Tài liệu: Cloud Router Docs. -
Add two additional NICs to Instance #1 with the following configuration: • NIC1 ← VPC: VPC #2 ← SUBNETWORK: subnet #2 • NIC2 ← VPC: VPC #3 ← SUBNETWORK: subnet #3 Update firewall rules to enable traffic between instances.
✅ Đúng (như giải thích trên). Giải pháp tối ưu, trực tiếp, an toàn. -
Create two VPN tunnels via CloudVPN: • 1 between VPC #1 and VPC #2. • 1 between VPC #2 and VPC #3. Update firewall rules to enable traffic between the instances.
❌ Sai. Cloud VPN (HAVPN/IPsec) dùng cho kết nối site-to-site qua public IP hoặc Internet, không phải internal IPs thuần túy. Cấu hình chỉ kết nối #1-#2 và #2-#3 (không trực tiếp #1-#3), traffic #1-#3 phải qua #2 (không direct). Độ trễ cao, phức tạp, không khuyến khích cho intra-GCP.
📘 Tài liệu: Cloud VPN Docs. -
Peer all three VPCs: • Peer VPC #1 with VPC #2. • Peer VPC #2 with VPC #3. Update firewall rules to enable traffic between the instances.
❌ Sai. VPC Peering cho phép internal IP cross-VPC, nhưng không transitive (không lan truyền): #1 chỉ reach #2, không reach #3 qua #2. Cần peer trực tiếp #1-#3 (không có trong lựa chọn). Peering toàn VPC làm "less separated" subnets (toàn bộ traffic có thể leak nếu firewall lỏng), vi phạm "must remain separated". Multi-NIC tốt hơn vì chỉ giới hạn ở instance cụ thể.
📘 Tài liệu: VPC Peering Docs.
🔍 Kết luận: Giải pháp Multi-NIC là best practice cho trường hợp instance cần multi-homing cross-VPC mà giữ isolation cao nhất. Nếu triển khai, kiểm tra quota NIC (mặc định 8 NIC/instance).
- A Create a Compute Engine instance template using the most recent Debian image. Create an instance from this template, and install and configure the application as part of the startup script. Repeat this process whenever a new Google-managed Debian image becomes available.
- B Create a Debian-based Compute Engine instance, install and configure the application, and use OS patch management to install available updates.
- C Create an instance with the latest available Debian image. Connect to the instance via SSH, and install and configure the application on the instance. Repeat this process whenever a new Google-managed Debian image becomes available.
- D Create a Docker container with Debian as the base image. Install and configure the application as part of the Docker image creation process. Host the container on Google Kubernetes Engine and restart the container whenever a new update is available.
Xem giải thích
🧩 Phân tích nội dung câu hỏi
Câu hỏi yêu cầu triển khai một ứng dụng trên Google Cloud (không phải AWS như đề cập nhầm, vì toàn bộ ngữ cảnh là GCP Compute Engine và các dịch vụ liên quan). Ứng dụng phải chạy trên môi trường Debian Linux, đòi hỏi cấu hình phức tạp để hoạt động đúng. Mục tiêu chính là đảm bảo cập nhật phân phối Debian (OS updates) một cách tự động hoặc với can thiệp thủ công tối thiểu mỗi khi có bản cập nhật mới.
🔑 Yêu cầu cốt lõi:
- Sử dụng Debian image.
- Cấu hình ứng dụng chi tiết (không đơn giản).
- Ưu tiên minimal manual intervention cho OS updates → Cần giải pháp tự động hóa việc patch OS mà không phải rebuild instance hoặc container mỗi lần.
Dựa trên kiến thức GCP cập nhật đến 2026 (phiên bản OS Patch Management mới nhất từ Google Cloud Compute Engine), giải pháp lý tưởng là tận dụng OS Patch Management để tự động áp dụng các bản vá bảo mật và cập nhật OS trên instance đang chạy.
📘 Tài liệu tham khảo:
- Google Cloud OS Patch Management Overview (hỗ trợ Debian, tự động patch với cron jobs hoặc one-time patches).
- Compute Engine Images (Debian images được quản lý bởi Google).
✅ Đáp án đúng và lý do lựa chọn
Đáp án đúng: Create a Debian-based Compute Engine instance, install and configure the application, and use OS patch management to install available updates.
Lý do 🛠️:
- Tạo instance Compute Engine dựa trên Debian → Đáp ứng yêu cầu môi trường Linux cụ thể.
- Cài đặt và cấu hình ứng dụng một lần → Phù hợp với ứng dụng cần cấu hình phức tạp.
- Sử dụng OS Patch Management (tính năng built-in của GCP từ 2023, cập nhật 2026 hỗ trợ Debian 12+): Tự động quét và áp dụng updates OS (security patches, minor updates) mà không cần can thiệp thủ công, qua cron jobs hàng tuần hoặc on-demand. Điều này đảm bảo minimal manual intervention, instance chạy liên tục mà OS luôn cập nhật. Hoàn hảo cho production!
❌ Phân tích tất cả các phương án (A-D)
Dưới đây là phân tích chi tiết từng lựa chọn, giữ nguyên văn bản gốc tiếng Anh. Mỗi phương án được đánh giá đúng/sai với lý do cụ thể dựa trên best practices GCP.
-
[SAI] Create a Compute Engine instance template using the most recent Debian image. Create an instance from this template, and install and configure the application as part of the startup script. Repeat this process whenever a new Google-managed Debian image becomes available.
❌ Sai vì: Yêu cầu lặp lại toàn bộ quá trình (tạo template mới, instance mới, chạy startup script) mỗi khi có Debian image mới → Manual intervention cao, không minimal. Startup script phù hợp cho config đơn giản, nhưng với ứng dụng phức tạp thì không hiệu quả. Không tận dụng OS Patch Management. -
[ĐÚNG] Create a Debian-based Compute Engine instance, install and configure the application, and use OS patch management to install available updates.
✅ Đúng vì: Như đã giải thích ở trên. Instance chạy ổn định, config một lần, OS Patch Management tự động xử lý updates Debian (ví dụ:gcloud compute os-config patch-jobshoặc agent auto-patch) → Minimal intervention, tuân thủ zero-downtime best practices GCP 2026. -
[SAI] Create an instance with the latest available Debian image. Connect to the instance via SSH, and install and configure the application on the instance. Repeat this process whenever a new Google-managed Debian image becomes available.
❌ Sai vì: Toàn bộ thủ công qua SSH + lặp lại mỗi update image → Manual cao nhất, không scale, dễ lỗi con người. Không dùng bất kỳ automation nào cho patching, vi phạm yêu cầu minimal intervention. -
[SAI] Create a Docker container with Debian as the base image. Install and configure the application as part of the Docker image creation process. Host the container on Google Kubernetes Engine and restart the container whenever a new update is available.
❌ Sai vì: Docker trên GKE dùng container image immutable, updates OS yêu cầu rebuild image + redeploy pod → Vẫn manual (push image mới, rolling update). Không tận dụng OS Patch Management (GKE tập trung app layer, không phải host OS). Với config phức tạp, baking vào image làm image bloated và khó maintain (vi phạm immutable infrastructure principle).
🏆 Kết luận: Phương án đúng tối ưu hóa automation patching trên Compute Engine, giúp ứng dụng chạy mượt mà lâu dài mà không gián đoạn! Nếu cần implement, dùng gcloud compute instances create + enable OS Config agent.